Love this? Save it for later!
Share the inspiration with your friends
“You seriously made these rings? They’re insane!” My friend’s words caught me off guard mid-bite, the kind of surprise that makes you grin while trying not to look too smug. Honestly, I wasn’t planning on impressing anyone that night. It started as a last-minute throw-together because my usual go-to snack stash was empty, and the thought of another sad bowl of chips just didn’t cut it. There was some half-forgotten baguette lurking in the fridge, a block of mozzarella begging to be used, and garlic powder—well, that’s always hanging around.
So I rolled up my sleeves, made a quick garlic butter mix, wrapped it around some bread slices, added cheese, and twisted them into rings. Total experiment. I wasn’t sure if the whole thing would hold together or end up a gooey mess, but the smell alone was worth the risk. The kitchen filled with this warm, toasted garlic aroma that instantly felt like a cozy hug.
By the time they came out of the oven, golden and crispy, I was hooked. And apparently, so were my guests. That night turned into a spontaneous party hit and even inspired me to tweak the recipe a few times during the week (yeah, we’re talking multiple rounds in less than seven days). These Crispy Cheesy Garlic Bread Rings aren’t just your average snack — they’re the kind of crowd-pleaser that sneaks up on you and leaves everyone asking for seconds.
There’s something about the crunchy exterior paired with that melty, garlicky, cheesy center that just works wonders. No fancy ingredients, no crazy equipment, just honest-to-goodness comfort food that somehow manages to look fancy enough to wow the crowd. I love how they bring people together — whether it’s a casual hangout or an impromptu get-together, they hit the spot every time.
So, if you’re up for a little kitchen magic that feels both familiar and exciting, stick around. I promise this recipe will become your secret weapon for effortless entertaining.
Why You’ll Love This Recipe
From my experience testing this recipe over several weeks, these Crispy Cheesy Garlic Bread Rings have become my go-to for quick snacks and party starters. Here’s why they stand out:
- Quick & Easy: Ready in under 30 minutes, perfect for those last-minute cravings or unexpected guests.
- Simple Ingredients: Nothing fancy here — mostly pantry staples you probably already have, like bread, cheese, and garlic.
- Perfect for Parties: Whether it’s a casual game night or a holiday gathering, these rings always disappear fast.
- Crowd-Pleaser: Kids and adults alike find them irresistible — cheesy, crispy, and packed with flavor.
- Unbelievably Delicious: The crispy crust combined with the gooey garlic cheese inside is pure comfort food in every bite.
What really makes this recipe different is the ring shape, which adds a fun twist to traditional garlic bread. It’s not just slathered-on butter and cheese; the rings offer a perfect bite-sized combination of textures. Plus, I blend my own garlic butter mix with fresh herbs, which gives it a fresh, vibrant kick that you won’t find in store-bought versions.
Honestly, this recipe is my little secret weapon when I want to impress without stress. It’s the kind of snack that makes people pause mid-conversation, close their eyes for a second, and savor that melty, garlicky goodness. Trust me, once you try these, you’ll find every occasion worth making them for — even if it’s just a quiet night in.
What Ingredients You Will Need
This recipe uses simple, wholesome ingredients to deliver bold flavor and satisfying texture without fuss. Most are pantry staples, with a few fresh touches to keep things lively.
- Bread: 1 large baguette or Italian bread loaf, sliced into 1-inch rounds (day-old bread works great for better texture)
- Cheese: 1 cup shredded mozzarella (I prefer Sargento for its meltiness), plus ½ cup shredded Parmesan for topping
- Butter: ½ cup unsalted butter, softened (use plant-based butter for a dairy-free version)
- Garlic: 3-4 cloves, minced fresh garlic or 1 tablespoon garlic powder (fresh gives the best punch, but powder works in a pinch)
- Herbs: 2 tablespoons fresh parsley, finely chopped (or 2 teaspoons dried Italian seasoning)
- Salt: ½ teaspoon kosher salt (adjust as needed)
- Black Pepper: Freshly ground, about ¼ teaspoon
- Optional: ¼ teaspoon red pepper flakes for a subtle heat kick
For substitutions, almond flour or gluten-free bread works well for those avoiding gluten. If you want to switch up the cheese, try a mix of cheddar and mozzarella for a sharper flavor. For a vegan version, swap the butter and cheese for plant-based alternatives — just expect a slightly different texture but still tasty.
In summer, I sometimes add finely chopped sun-dried tomatoes or fresh basil to the garlic butter for a seasonal twist. It brightens the flavor beautifully.
Equipment Needed
- Baking sheet (a rimmed one helps catch any drips)
- Parchment paper or silicone baking mat for easy cleanup
- Mixing bowl for the garlic butter
- Small knife or garlic press for mincing garlic
- Grater for shredding cheese (unless you buy pre-shredded)
- Pastry brush or spoon to spread butter mixture
- Oven or toaster oven capable of reaching 375°F (190°C)
If you don’t have a pastry brush, a spoon works fine to spread the butter mixture evenly. For those on a budget, a simple baking sheet lined with foil also does the trick, though cleanup might take a little more effort.
Personally, I like using a silicone baking mat because it prevents sticking and browning too quickly on the bottom. Also, a sharp bread knife makes slicing the baguette easier and keeps the rounds neat for shaping.
Preparation Method
- Preheat your oven to 375°F (190°C). Line the baking sheet with parchment paper or a silicone mat to prevent sticking. This usually takes about 5 minutes.
- Slice the bread: Cut the baguette into 1-inch (2.5 cm) thick rounds. You should get around 15-18 slices, depending on the loaf size. Set aside.
- Make the garlic butter: In a mixing bowl, combine the softened butter, minced garlic, chopped parsley, salt, black pepper, and red pepper flakes (if using). Mix well until smooth and creamy. This step takes about 3-5 minutes and sets the flavor foundation.
- Spread the butter: Using a pastry brush or spoon, generously spread the garlic butter mixture on one side of each bread slice. Don’t skimp here — that buttery garlic layer is key to flavor.
- Add the cheese: Sprinkle a good layer of shredded mozzarella on top of each buttered slice. Then, add a pinch of Parmesan on top for that extra sharpness and crunch.
- Form the rings: Take two bread rounds and gently press their edges together to form a ring shape, cheese sides facing inward. If the bread is slightly stale, the edges will stick better. If you find it tricky, a tiny dab of extra butter can act like glue.
- Place the rings on the baking sheet: Arrange them evenly, leaving about an inch of space between each ring to allow air circulation for crispiness.
- Bake: Put the tray into the preheated oven and bake for 12-15 minutes, or until the bread edges turn golden brown and crispy, and the cheese inside is bubbly and melted.
- Cool slightly and serve: Let the rings rest for 3-5 minutes before serving. This helps the cheese set a bit, making them easier to pick up without a mess.
Quick tip: If your garlic butter feels too thick, you can warm it slightly in the microwave for 10-15 seconds to soften it — makes spreading much easier. Also, keep an eye on the rings in the last few minutes; ovens can vary, and you want that perfect golden crunch without burning.
Cooking Tips & Techniques
Getting the perfect crispy cheesy garlic bread rings is all about balancing texture and flavor — here’s what I’ve learned through trial and error:
- Use slightly stale bread: It holds up better when forming rings and crisps up nicely without getting soggy.
- Don’t overload the cheese: Too much can turn the rings into a gooey mess. Keep a moderate layer for melty but contained cheese.
- Make your garlic butter fresh: Pre-mixed garlic powders can be dull. Fresh minced garlic gives a brighter, punchier flavor.
- Bake at the right temperature: 375°F (190°C) is a sweet spot that crisps the bread without burning the butter or cheese.
- Watch the baking time closely: The rings can quickly go from golden to burnt, especially if your oven runs hot.
- Let them cool before serving: This avoids cheese drips and makes them easier to pick up.
One lesson I learned the hard way: trying to form rings with bread that’s too fresh makes the shape fall apart. It’s worth letting the bread sit out for a few hours or using day-old slices.
Also, multitasking helps — while the rings bake, I usually prep a quick dipping sauce or set the table. It keeps the momentum going without feeling rushed.
Variations & Adaptations
These crispy cheesy garlic bread rings are super versatile. Here are some fun twists I’ve tried and loved:
- Spicy Jalapeño Rings: Add finely diced jalapeños into the garlic butter for a fiery kick that pairs beautifully with the cheese.
- Herbed Cream Cheese Filling: Swap mozzarella with a mix of cream cheese blended with fresh herbs like chives and thyme for a creamy, tangy center.
- Gluten-Free Version: Use gluten-free baguette or thick gluten-free bread slices. The texture changes slightly but the flavor remains delicious.
- Vegan Adaptation: Replace butter with vegan margarine and cheese with your favorite plant-based shreds. Adding nutritional yeast to the garlic butter can boost that cheesy flavor.
- Seasonal Twist: In fall, I add a sprinkle of roasted pumpkin seeds and sage to the garlic butter for a cozy seasonal touch.
For a different cooking method, these rings can also be toasted in an air fryer at 350°F (175°C) for about 8-10 minutes — just keep an eye to prevent burning. I tried this once when I was short on oven space, and they came out surprisingly crisp.
Serving & Storage Suggestions
Serve these garlic bread rings warm or at room temperature to get the full crispy-cheesy experience. They make fantastic finger foods for parties — I often pair them with a tangy marinara or a creamy ranch dip for extra flavor.
Want to make a full spread? Try pairing them with cozy homemade pretzel dogs or a hearty chicken pizzaiola for a filling meal with varied textures and tastes.
To store leftovers, place the rings in an airtight container in the refrigerator for up to 2 days. Reheat them in a toaster oven or regular oven at 350°F (175°C) for 5-7 minutes to bring back the crispiness. Avoid microwaving if you want to keep that crunch — it tends to make them soggy.
Flavors actually deepen a bit after a day in the fridge, so sometimes I make extra intentionally. Just reheat before serving for that fresh-out-of-the-oven vibe.
Nutritional Information & Benefits
This recipe isn’t just about indulgence — the ingredients bring some surprising benefits. Each serving (about 2 rings) contains roughly:
| Nutrient | Amount |
|---|---|
| Calories | 220-250 kcal |
| Protein | 8-10 grams (mainly from cheese) |
| Fat | 15 grams (mostly from butter and cheese) |
| Carbohydrates | 15-18 grams (from bread) |
| Fiber | 1-2 grams |
Garlic is well-known for its antioxidant properties and may support heart health. Using fresh herbs adds minimal calories but boosts micronutrients and flavor. Choosing whole-grain or artisan breads can increase fiber content and nutritional value.
This recipe can be tailored for different dietary needs—gluten-free, vegan, or lower-fat versions are easy swaps. Just keep in mind the cheese and butter provide most of the richness and protein, so substitutes may change the nutritional profile.
Conclusion
These Crispy Cheesy Garlic Bread Rings have carved out a special spot in my kitchen repertoire — they’re easy to make, packed with flavor, and bring people together effortlessly. Whether you’re hosting a casual night or just craving a satisfying snack, these rings deliver that perfect balance of crispy, cheesy, and garlicky goodness that’s hard to beat.
Feel free to customize the herbs, cheese, or spice level to fit your taste. Honestly, the recipe’s forgiving nature makes it a fun canvas for creativity, so don’t hesitate to experiment.
Give them a try, and I bet they’ll become your new favorite party snack too — just like they did for me. And hey, if you ever want a sweet treat to follow up, you might enjoy the moist chocolate chip banana bread that’s been a recent comfort in my house.
Happy baking, and may your next gathering be filled with laughter, good food, and plenty of these crispy, cheesy rings!
FAQs About Crispy Cheesy Garlic Bread Rings
Can I use any type of bread for this recipe?
Yes, but a firm, slightly stale baguette or Italian bread works best to hold the ring shape and crisp up nicely. Soft sandwich bread tends to get soggy and fall apart.
How do I make these rings vegan?
Swap the butter with a plant-based margarine and use vegan cheese shreds. Fresh garlic and herbs stay the same for flavor. The texture will be a bit different but still tasty.
Can I prepare these ahead of time?
You can assemble the rings and keep them covered in the fridge for a few hours before baking. Just bring them to room temperature first for even cooking.
What dips go well with these garlic bread rings?
Classic marinara, ranch dressing, or even a spicy sriracha mayo complement the cheesy garlic flavor wonderfully.
Can I freeze these for later?
Yes, freeze unbaked rings on a tray, then transfer to a freezer bag. Bake straight from frozen, adding a few extra minutes to the cooking time.
Pin This Recipe!
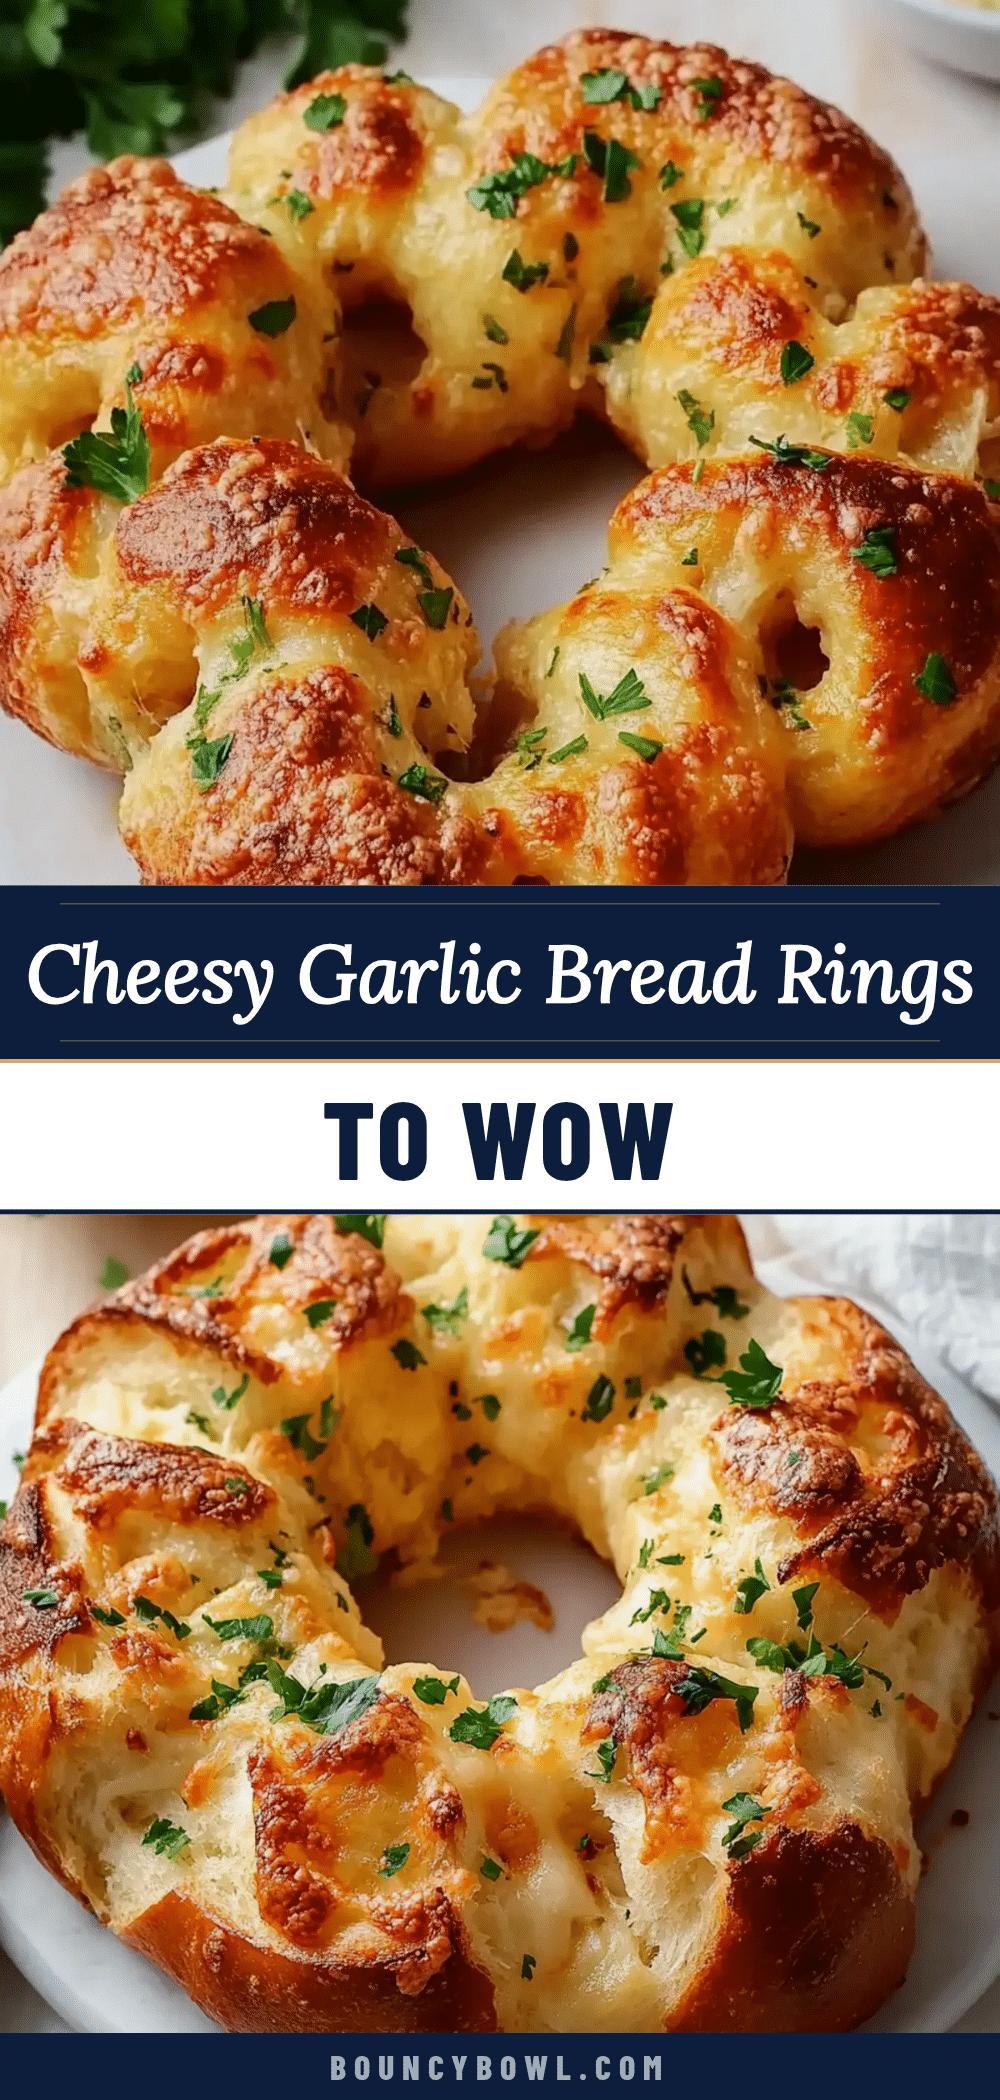
Crispy Cheesy Garlic Bread Rings

These crispy cheesy garlic bread rings are an easy, crowd-pleasing party snack featuring a crunchy exterior and a melty, garlicky, cheesy center. Perfect for quick snacks or entertaining guests.
- Prep Time: 10 minutes
- Cook Time: 15 minutes
- Total Time: 25 minutes
- Yield: 15-18 rings 1x
- Category: Snack
- Cuisine: American
Ingredients
- 1 large baguette or Italian bread loaf, sliced into 1-inch rounds (day-old bread works best)
- 1 cup shredded mozzarella cheese
- ½ cup shredded Parmesan cheese for topping
- ½ cup unsalted butter, softened (plant-based butter for dairy-free version)
- 3–4 cloves fresh garlic, minced or 1 tablespoon garlic powder
- 2 tablespoons fresh parsley, finely chopped (or 2 teaspoons dried Italian seasoning)
- ½ teaspoon kosher salt
- ¼ teaspoon freshly ground black pepper
- ¼ teaspoon red pepper flakes (optional)
Instructions
- Preheat your oven to 375°F (190°C). Line a baking sheet with parchment paper or a silicone baking mat.
- Slice the baguette into 1-inch thick rounds, about 15-18 slices depending on loaf size. Set aside.
- In a mixing bowl, combine softened butter, minced garlic, chopped parsley, salt, black pepper, and red pepper flakes (if using). Mix until smooth and creamy.
- Using a pastry brush or spoon, generously spread the garlic butter mixture on one side of each bread slice.
- Sprinkle shredded mozzarella cheese on top of each buttered slice, then add a pinch of Parmesan cheese on top.
- Take two bread rounds and gently press their edges together to form a ring shape with cheese sides facing inward. Use a dab of extra butter if needed to help edges stick.
- Place the rings evenly spaced on the prepared baking sheet, leaving about an inch between each.
- Bake in the preheated oven for 12-15 minutes, until the bread edges are golden brown and crispy and the cheese inside is bubbly and melted.
- Let the rings cool for 3-5 minutes before serving to allow the cheese to set.
Notes
Use slightly stale bread for better ring formation and crispiness. Watch baking time closely to avoid burning. Let rings cool slightly before serving to prevent cheese drips. For vegan version, substitute butter and cheese with plant-based alternatives. Can be toasted in air fryer at 350°F for 8-10 minutes as an alternative cooking method.
Nutrition
- Serving Size: About 2 rings
- Calories: 235
- Sugar: 1
- Sodium: 350
- Fat: 15
- Saturated Fat: 9
- Carbohydrates: 17
- Fiber: 1.5
- Protein: 9
Keywords: garlic bread, cheesy bread, party snack, appetizer, easy recipe, garlic butter, crispy bread rings