Love this? Save it for later!
Share the inspiration with your friends
“You have to try this!” my friend texted me one sweltering afternoon, and honestly, I wasn’t expecting much. Watermelon mochi? It sounded like a summer gimmick—a cute snack that probably wouldn’t live up to the hype. But hey, I was curious enough to give it a shot. The first bite was a surprise: cool, chewy, and sweet with that unmistakable fresh watermelon punch. It was a tiny escape from the heat, a little burst of summer wrapped in a tender mochi blanket. Since then, I’ve made this easy delightful watermelon mochi more times than I can count—sometimes as a quick snack after work, other times as a refreshing treat for unplanned guests. The best part? It’s simple enough that even late at night, when the kitchen feels like my sanctuary, I can whip it up without breaking a sweat.
Watermelon mochi stuck with me because it’s not just a dessert; it’s a mood. A cool, breezy moment in the middle of a hectic day. The chewy texture balances perfectly with the juicy watermelon center, and honestly, it’s one of those recipes that feels fancy but takes next to no effort. It’s become my go-to for unexpected summer gatherings and a fun twist to impress friends without fuss.
It’s funny how a simple idea like wrapping fresh fruit in soft mochi can make such a difference. And while I’m usually all about cozy, hearty dishes like my Sicilian chicken soup, this watermelon mochi has its own place in my recipe lineup—light, playful, and undeniably refreshing.
Why You’ll Love This Recipe
This easy watermelon mochi recipe has been tested in my kitchen multiple times, and it’s honestly a winner for so many reasons. Here’s what makes it stand out:
- Quick & Easy: From start to finish, it takes under 30 minutes—perfect when the heat makes you want to keep cooking minimal.
- Simple Ingredients: You probably have everything on hand: sweet watermelon, glutinous rice flour, sugar, and a few pantry basics.
- Perfect for Summer: This recipe is a no-brainer for backyard barbecues, pool parties, or even a casual afternoon snack.
- Crowd-Pleaser: Kids and adults alike can’t get enough of the chewy, juicy combo. It’s a treat that brings smiles every time.
- Unbelievably Delicious: The texture contrast—the cool watermelon center against the soft, slightly stretchy mochi skin—is just addictive.
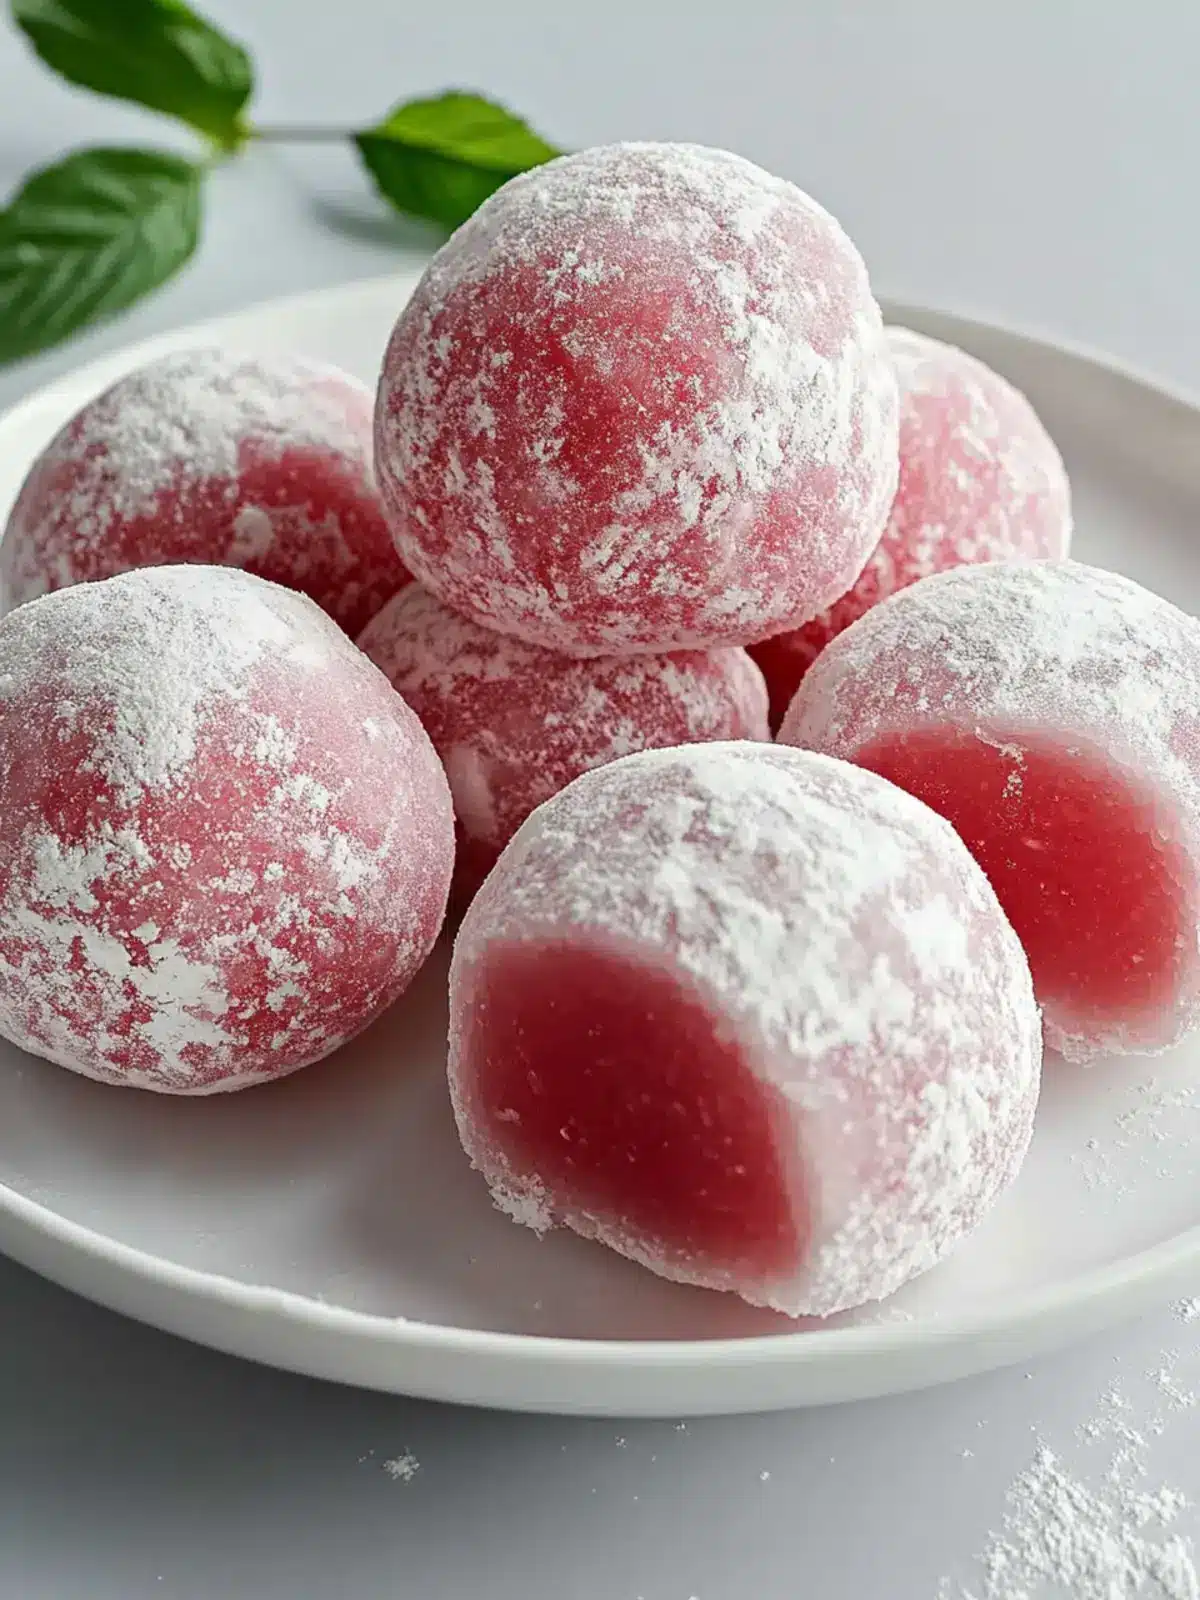
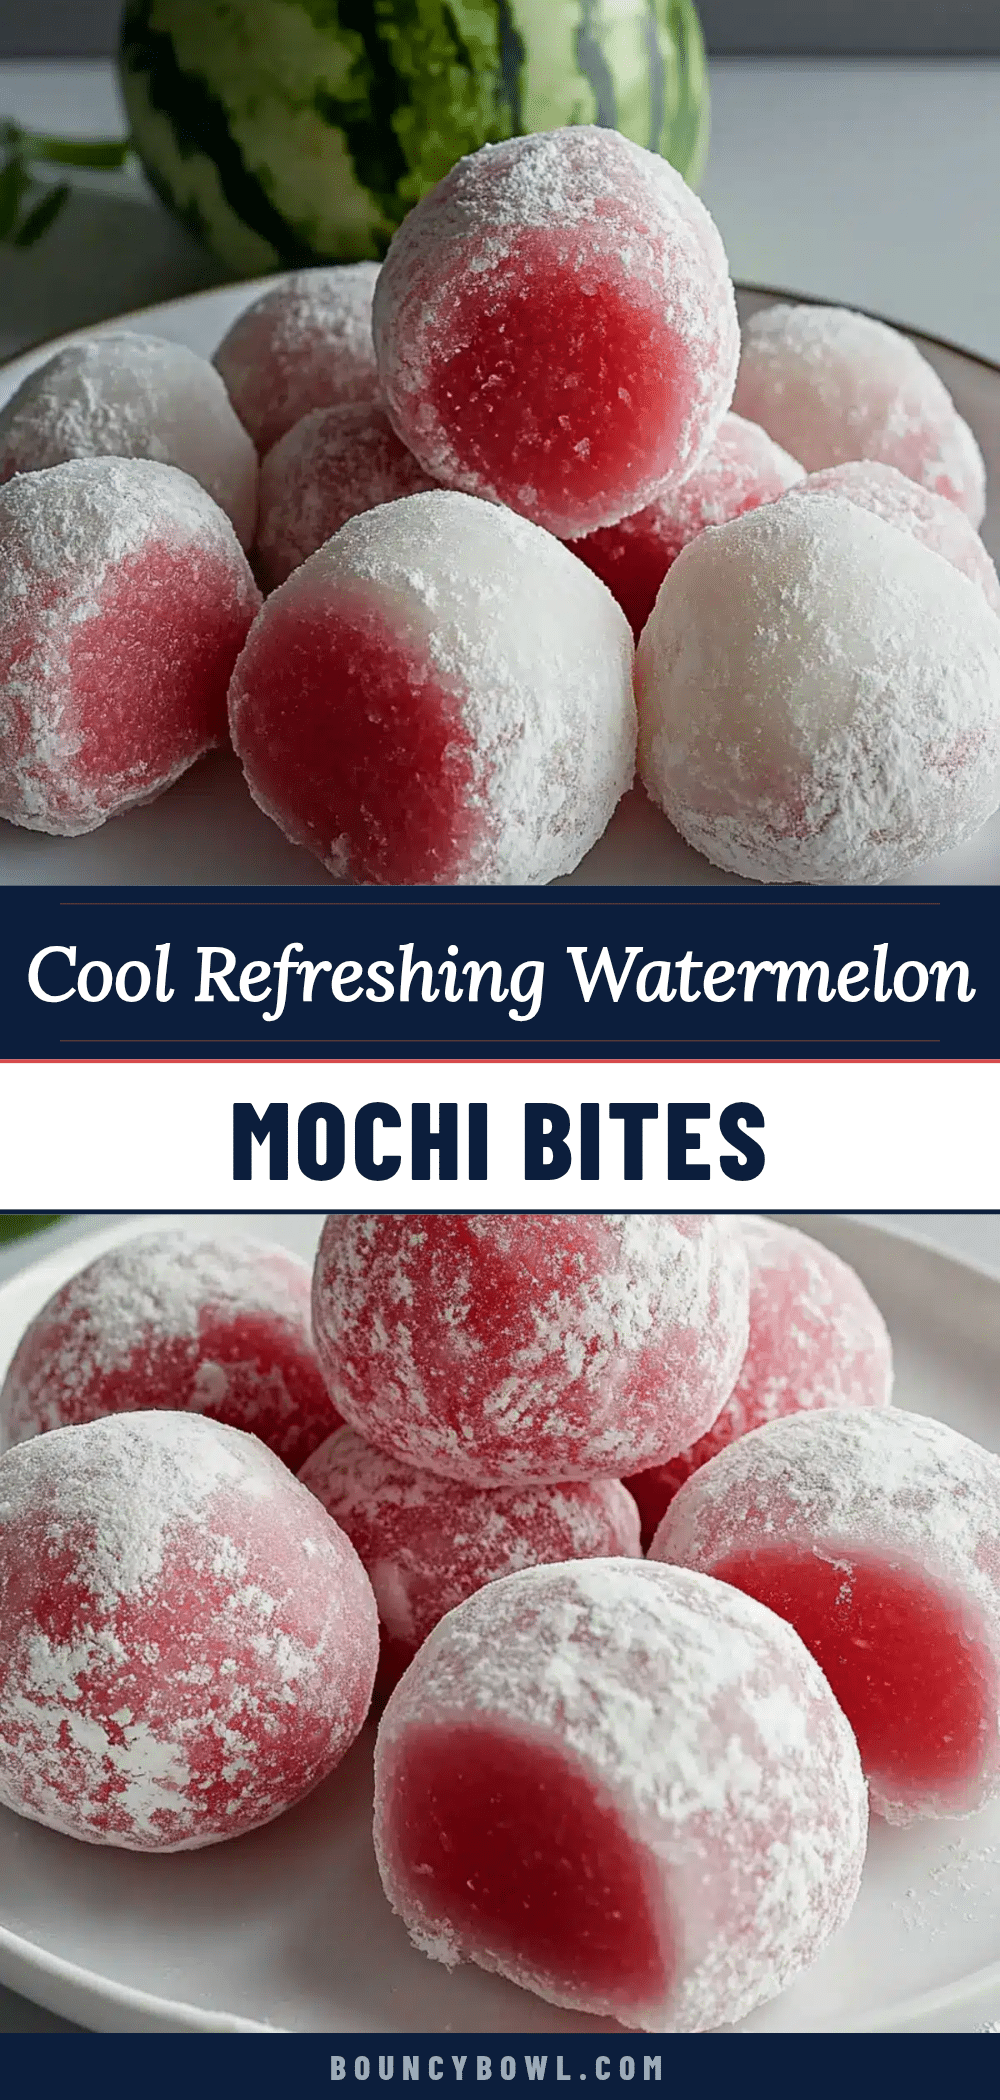
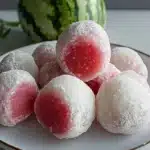
What really sets this recipe apart is the balance: the mochi isn’t too sticky or tough, and the watermelon chunks stay juicy instead of getting soggy. I also like to add a touch of powdered sugar dusting for that subtle sweetness and presentation flair. It’s not just another mochi recipe; it’s a playful nod to summer’s best fruit, wrapped in a chewy hug.
This recipe isn’t about complicated techniques—honestly, it’s the kind of dessert that makes you close your eyes and just enjoy that refreshing bite, reminding you why simple can be so satisfying. If you want a cool, delightful treat that’s as fun to eat as it is to make, this watermelon mochi is your answer.
What Ingredients You Will Need
This recipe uses simple, wholesome ingredients to deliver that bright, sweet flavor and chewy texture without fuss. Most are pantry staples or fresh produce you can easily find, and there’s room to tweak if you want to accommodate dietary preferences.
- Glutinous Rice Flour (Mochiko): 1 cup (120g) – This is the magic behind that chewy mochi texture. Look for brands like Bob’s Red Mill for consistency.
- Watermelon: About 1 cup, cut into 1-inch cubes – Fresh, ripe watermelon is key. Choose seedless if possible to avoid surprise bites.
- Sugar: 1/4 cup (50g) – Just enough to sweeten the mochi dough without overpowering the watermelon’s natural flavor.
- Water: 2/3 cup (160ml) – To hydrate the rice flour and form the dough.
- Potato starch or cornstarch: For dusting – Keeps the mochi from sticking to your hands and surfaces.
- Optional: A pinch of salt – Balances the sweetness.
If you want a slight twist, you can swap the watermelon for other juicy fruits like mango or kiwi, but watermelon’s crisp, fresh flavor really shines here. For a gluten-free version, rest assured glutinous rice flour is naturally gluten-free, making this a friendly option for many.
Equipment Needed
- Microwave-safe bowl or heatproof mixing bowl: For cooking the mochi dough easily without fuss.
- Steamer or a large pot with a steaming rack: If you prefer steaming the mochi dough instead of microwaving.
- Mixing spoon or spatula: For stirring the dough mixture.
- Measuring cups and spoons: Accuracy helps, especially with the rice flour and water ratio.
- Sharp knife and cutting board: For cutting the watermelon into perfect bite-sized cubes.
- Powdered sugar or starch sifter: Optional but useful for dusting the mochi to prevent stickiness.
Honestly, you don’t need anything fancy. I’ve even used a silicone spatula and microwave in a pinch, and it worked just fine. If you don’t have a microwave, steaming the mochi dough works beautifully—just keep an eye so it doesn’t get too rubbery. For dusting, potato starch is my favorite because it doesn’t absorb moisture like cornstarch, but both work well.
Preparation Method
- Prepare the watermelon: Cut fresh watermelon into 1-inch cubes. Pat dry gently with paper towels to remove excess moisture. This helps prevent the mochi from becoming soggy. Set aside.
- Mix the mochi dough: In a microwave-safe bowl, combine 1 cup (120g) glutinous rice flour, 1/4 cup (50g) sugar, and a pinch of salt (if using). Stir to combine.
- Add water: Pour in 2/3 cup (160ml) water gradually while stirring to form a smooth batter. Make sure there are no lumps; it should be a slightly thick but pourable consistency.
- Cook the dough: Microwave the mixture on high for 1 minute. Stir quickly with a spatula, scraping the sides. Microwave again for 1 minute. Stir once more.
- Final cook and check: Microwave for a final 30 seconds to 1 minute until the dough is sticky and slightly translucent. If you prefer steaming, pour the batter into a greased heatproof dish and steam for 15-20 minutes until cooked through.
- Dust your surface: Generously sprinkle potato starch or cornstarch on a clean surface or cutting board.
- Shape the mochi: Transfer the hot mochi dough onto the starch-dusted surface. Let it cool for a minute or two until manageable but still warm. Dust your hands with starch, pinch off small pieces of dough, flatten them into disks about 2-3 inches in diameter.
- Wrap the watermelon: Place one watermelon cube in the center of each mochi disk. Carefully fold the edges over the fruit, pinching to seal. Dust off any excess starch.
- Chill and serve: Place the wrapped mochi in the fridge for at least 10 minutes to firm up before serving. This step helps the mochi skin become pleasantly chewy and cool.
Pro tip: If the dough gets too sticky to handle, dust your hands again or chill the dough briefly. Also, don’t overcook the mochi dough or it might turn tough. The texture should be soft and slightly stretchy.
Cooking Tips & Techniques
Getting the perfect mochi texture can feel a little tricky at first, but here are some tips I’ve learned the hard way:
- Microwave vs. Steaming: Microwaving is super fast and convenient, but steaming offers a more even cook and less dryness risk. If you have time, try steaming once—you might like the softer texture.
- Don’t skip the starch dusting: Mochi is notoriously sticky. Without enough potato starch or cornstarch on your hands and surface, you’ll get frustrated fast. Trust me on this one.
- Work quickly but carefully: Mochi dough cools fast and becomes harder to shape. Have your watermelon cubes ready and your surface prepped before cooking the dough.
- Moisture control: Patting the watermelon dry is crucial. Too much juice leaks out, making the mochi soggy and harder to seal.
- Storage tip: Mochi is best eaten fresh but can be refrigerated for up to 2 days. Avoid freezing as it changes the texture.
I remember the first time I tried skipping the starch dusting—sticky fingers everywhere and a kitchen mess. Now, I always keep starch handy and consider it a non-negotiable step. Also, using a silicon spatula helps scrape and stir the hot mochi dough without it sticking to your tools.
Variations & Adaptations
This recipe is a great base for playful adaptations depending on your mood or dietary needs. Here are some ideas:
- Fruit swaps: Try swapping watermelon with mango, kiwi, or even a grape for different bursts of flavor.
- Flavor the mochi: Add a teaspoon of matcha powder or a splash of rose water to the dough for a subtle twist.
- Vegan & Gluten-Free: This recipe is naturally vegan and gluten-free since it uses glutinous rice flour (which is gluten-free despite the name).
- Sweet fillings: Instead of fresh fruit, small spoonfuls of sweet red bean paste or coconut cream can turn it into a lovely Asian-inspired dessert.
- Texture tweak: For a slightly firmer mochi skin, reduce water by 1-2 tablespoons, but be careful not to dry it out.
One personal favorite is adding a sprinkle of toasted coconut flakes inside with the watermelon cube—adds a bit of crunch and tropical vibes. And if you ever want a savory twist, check out my fresh ham and cream cheese cucumber rolls for a different kind of finger food fun.
Serving & Storage Suggestions
Watermelon mochi is best served chilled, straight from the fridge. The coolness complements the chewy mochi texture and juicy fruit perfectly. Arrange them on a pretty platter dusted lightly with starch or powdered sugar for a simple yet elegant presentation.
Pair these with light summer drinks like iced green tea or a sparkling lemonade—something crisp and refreshing to complement the sweetness. For a casual backyard party, they’re a perfect finger food alongside dishes like my refreshing lemonade punch.
If you have leftovers, store mochi in an airtight container in the refrigerator for up to 48 hours. Mochi texture changes over time, becoming firmer and less stretchy, but the flavor stays delicious. Avoid freezing, as it causes the dough to harden and lose its chewy charm. When ready to eat, let refrigerated mochi sit at room temperature for 10 minutes to soften slightly before enjoying.
Nutritional Information & Benefits
Each watermelon mochi piece is a light, refreshing treat with roughly 60-80 calories, depending on the size of the watermelon cube. The mochi dough is mostly carbohydrates from glutinous rice flour and sugar, providing quick energy without heaviness.
Watermelon is rich in hydration (over 90% water), vitamins A and C, and antioxidants like lycopene, which support skin health and immunity. This makes watermelon mochi a guilt-free way to satisfy a sweet craving while staying hydrated on hot days.
Since the recipe is naturally gluten-free and vegan, it fits a range of dietary needs. Just watch out for any allergies related to rice or specific fruits you choose as fillings.
Conclusion
Easy delightful watermelon mochi is one of those rare recipes that feels like a small celebration of summer in every bite. It’s simple, playful, and genuinely refreshing, making it a recipe I keep returning to when the days get warm and the mood calls for something light. I love how it turns fresh fruit into a fun, chewy snack that everyone enjoys—whether it’s a quiet night alone or an impromptu gathering with friends.
Feel free to make it your own by switching up fruits or adding subtle flavors. This recipe welcomes creativity, and honestly, there’s no wrong way to enjoy it. If you give it a try, I’d love to hear how you customized your watermelon mochi, or if it reminded you of any other favorite summer treats. Happy cooking!
Frequently Asked Questions
How long does watermelon mochi last in the fridge?
It stays fresh for about 2 days when stored in an airtight container. Beyond that, the mochi skin firms up and loses its chewy texture.
Can I freeze watermelon mochi?
Freezing isn’t recommended because it changes the texture, making the mochi tough and less enjoyable.
What’s the best way to prevent mochi from sticking?
Generously dust your hands and work surface with potato starch or cornstarch before handling the mochi dough.
Can I use frozen watermelon for this recipe?
Frozen watermelon tends to be watery when thawed, which can make mochi soggy. Fresh watermelon is best for texture and flavor.
Is glutinous rice flour the same as regular rice flour?
No, glutinous rice flour (also called mochiko) is sticky when cooked and essential for mochi’s chewy texture. Regular rice flour won’t work the same way.
Pin This Recipe!
Easy Watermelon Mochi Recipe
A quick and refreshing summer treat featuring chewy mochi dough wrapped around juicy watermelon cubes. Perfect for backyard parties or a light snack.
- Prep Time: 10 minutes
- Cook Time: 10 minutes
- Total Time: 20 minutes
- Yield: 12 servings 1x
- Category: Dessert
- Cuisine: Japanese
Ingredients
- 1 cup (120g) glutinous rice flour (mochiko)
- 1 cup watermelon, cut into 1-inch cubes
- 1/4 cup (50g) sugar
- 2/3 cup (160ml) water
- Potato starch or cornstarch for dusting
- Pinch of salt (optional)
Instructions
- Cut fresh watermelon into 1-inch cubes. Pat dry gently with paper towels to remove excess moisture. Set aside.
- In a microwave-safe bowl, combine glutinous rice flour, sugar, and a pinch of salt if using. Stir to combine.
- Gradually pour in water while stirring to form a smooth, slightly thick but pourable batter with no lumps.
- Microwave the mixture on high for 1 minute. Stir quickly, scraping the sides.
- Microwave again for 1 minute. Stir once more.
- Microwave for a final 30 seconds to 1 minute until the dough is sticky and slightly translucent. Alternatively, steam the batter in a greased heatproof dish for 15-20 minutes until cooked through.
- Generously sprinkle potato starch or cornstarch on a clean surface or cutting board.
- Transfer the hot mochi dough onto the starch-dusted surface. Let cool for 1-2 minutes until manageable but still warm.
- Dust hands with starch, pinch off small pieces of dough, and flatten into 2-3 inch disks.
- Place one watermelon cube in the center of each mochi disk. Fold edges over the fruit and pinch to seal. Dust off excess starch.
- Place wrapped mochi in the fridge for at least 10 minutes to firm up before serving.
Notes
Dust hands and work surface generously with potato starch or cornstarch to prevent sticking. Pat watermelon dry to avoid soggy mochi. Mochi is best eaten fresh but can be refrigerated up to 2 days. Avoid freezing as it changes texture. Steaming offers a softer texture compared to microwaving.
Nutrition
- Serving Size: 1 mochi piece with w
- Calories: 70
- Sugar: 8
- Sodium: 5
- Carbohydrates: 17
- Fiber: 0.5
- Protein: 1
Keywords: watermelon mochi, summer dessert, mochi recipe, glutinous rice flour, chewy mochi, refreshing snack, gluten-free dessert, vegan dessert