Love this? Save it for later!
Share the inspiration with your friends
The first time I made crispy herbed tofu, I was honestly just trying to use up a block that had been sitting in the fridge for three days. You know how it goes—you buy tofu with good intentions, then it stares at you every time you open the door. I had a handful of fresh herbs wilting on the counter, a bottle of tamari that was almost empty, and absolutely no plan for dinner. But I was hungry, and I was stubborn.
So I pressed that block of tofu for way longer than I usually do, chopped the herbs without measuring (which never happens when I’m testing recipes), and tossed everything together with a little cornstarch and oil. I wasn’t expecting much. Honestly, I was sort of expecting a mushy, bland mess that I’d have to drown in hot sauce.
But when those golden, fragrant pieces came out of the oven—crispy on every edge, herby and salty and completely irresistible—I stood there in my kitchen eating them straight off the baking sheet. No plate. No shame. Just pure, unexpected satisfaction. And that’s how this recipe was born. It wasn’t planned. It was just one of those happy accidents that turned into a staple I now make at least once a week.
Why You’ll Love This Recipe
Let me tell you why this crispy herbed tofu has earned a permanent spot in my meal rotation. It’s not just another tofu recipe—it’s the one that even my tofu-skeptic friends ask for by name.
- Quick & Easy: From start to finish, this comes together in about 35 minutes. Most of that time is hands-off baking, so you can prep a side dish or just relax.
- Simple Ingredients: You probably already have everything you need. Tofu, fresh or dried herbs, oil, salt, and a little cornstarch for that signature crunch.
- Perfect for Snacking or Meals: It works as a high-protein snack, a salad topper, a bowl ingredient, or even the star of a quick stir-fry.
- Crowd-Pleaser: I’ve brought this to potlucks and watched it disappear before the main dishes even hit the table. It’s that good.
- Unbelievably Crispy: The texture is the real win here. No sad, rubbery tofu—just crunchy, golden edges with a tender inside.
What makes this recipe different from all the other crispy tofu recipes out there? It’s the herb situation. Instead of just sprinkling dried herbs on top, I mix them right into the coating so every single bite is packed with flavor. Plus, the technique of pressing the tofu properly and using just the right amount of cornstarch gives you that bakery-level crispiness without deep frying.
This is the kind of snack that makes you close your eyes after the first bite. It’s comfort food that happens to be packed with protein—and honestly, that’s the best kind of comfort food.
What Ingredients You Will Need
This recipe uses simple, wholesome ingredients to deliver bold flavor and satisfying crunch. Most of these are pantry staples, which makes this perfect for those days when you need something good but don’t want to run to the store.
- Extra-firm tofu (14-16 oz block): This is non-negotiable for the best texture. Extra-firm has less water, which means less pressing time and better crispiness. I prefer the House Foods or Nasoya brand for consistent results.
- Fresh herbs (2 tablespoons, finely chopped): My go-to combo is parsley and chives, but rosemary, thyme, or oregano work beautifully too. Use whatever you have on hand—just make sure they’re finely chopped so they stick to the tofu.
- Dried herbs (1 teaspoon each): I use dried oregano and dried basil for depth. Dried herbs are more concentrated, so they add a punch of flavor that fresh herbs can’t quite match.
- Cornstarch (2 tablespoons): This is the secret to that ultra-crispy coating. It creates a thin, crunchy shell that locks in moisture. You can substitute arrowroot powder if needed.
- Nutritional yeast (1 tablespoon): Optional but highly recommended. It adds a savory, almost cheesy flavor that makes the tofu incredibly addictive. I use the Bragg brand.
- Garlic powder (1 teaspoon): For that savory backbone. Don’t skip this—it makes everything better.
- Onion powder (½ teaspoon): Adds subtle sweetness and depth.
- Salt (½ teaspoon): I prefer fine sea salt for even distribution.
- Black pepper (¼ teaspoon): Freshly ground is best.
- Olive oil or avocado oil (2 tablespoons): Avocado oil has a higher smoke point, which helps with crispiness. Olive oil adds more flavor. Both work well.
- Tamari or soy sauce (1 tablespoon): For that umami kick. Tamari is gluten-free, but regular soy sauce works just fine. Use coconut aminos for a soy-free option.
Substitution Tips: If you don’t have fresh herbs, use 2 teaspoons of dried mixed herbs instead. For a gluten-free version, make sure your tamari or soy sauce is certified gluten-free. And if you’re avoiding oil, you can use vegetable broth instead—just note that the texture will be slightly less crispy.
Equipment Needed
You don’t need fancy equipment for this recipe, which is part of why I love it so much. Here’s what you’ll need:
- Baking sheet: A standard half-sheet pan works perfectly. Line it with parchment paper for easy cleanup.
- Parchment paper: Helps prevent sticking and makes cleanup a breeze. Silicone baking mats also work well.
- Tofu press or heavy books: A tofu press is a worthwhile investment if you cook tofu often—I use the TofuBud press and love it. But if you don’t have one, wrap the tofu in a clean kitchen towel and place a heavy cast iron skillet or a stack of books on top.
- Mixing bowls: One medium bowl for the coating mixture, one large bowl for tossing the tofu.
- Sharp knife and cutting board: For cubing the tofu and chopping herbs.
- Measuring spoons: For precise seasoning.
- Spatula: For flipping the tofu halfway through baking.
Budget-friendly tip: Skip the fancy tofu press. A plate with a few heavy cans on top works just as well—just make sure the tofu is wrapped in a towel to absorb the liquid.
Preparation Method
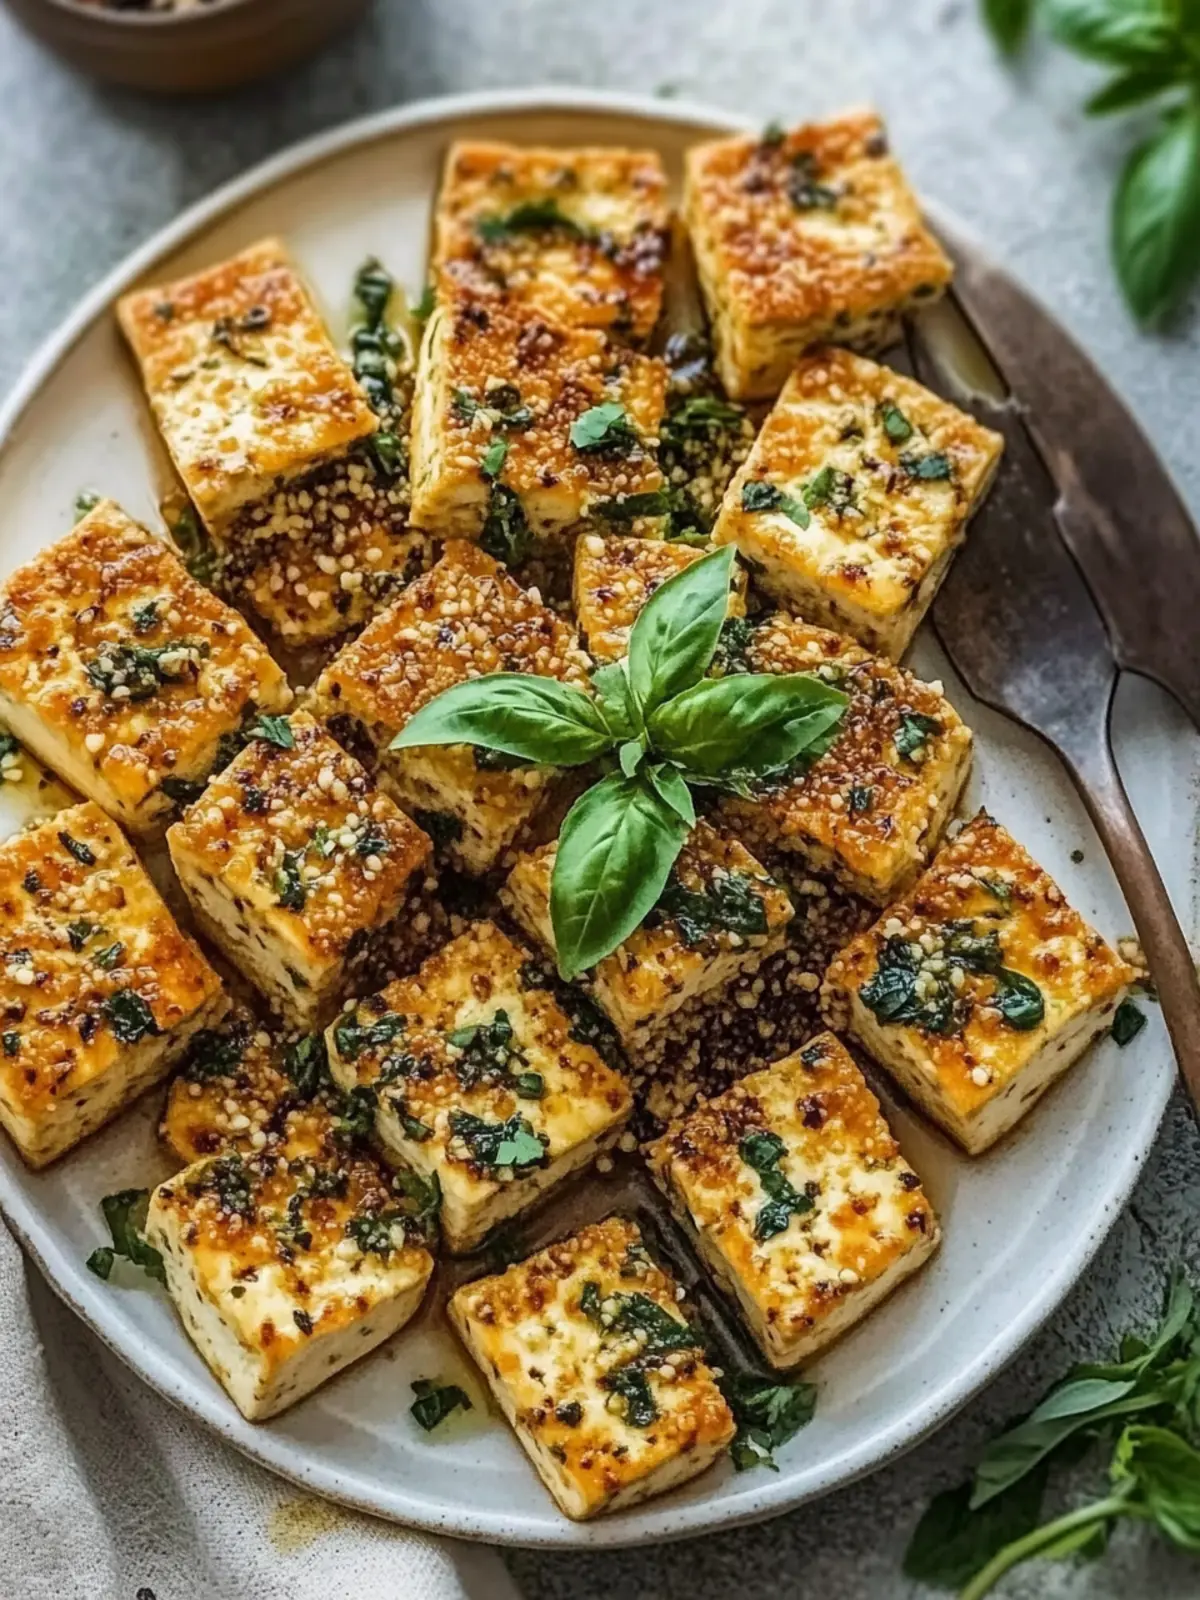
Follow these steps carefully, and you’ll have the crispiest, most flavorful tofu of your life. Trust me on the pressing—it makes all the difference.
- Press the tofu (20-30 minutes): Remove the tofu from its package and drain the water. Wrap the block in a clean kitchen towel or paper towels. Place it on a plate, then put another plate or a cutting board on top. Weigh it down with something heavy—a cast iron skillet, a few cans, or a stack of books. Let it press for at least 20 minutes. The longer you press, the crispier the result. I usually aim for 30 minutes.
- Preheat your oven: Set your oven to 400°F (200°C). Line a baking sheet with parchment paper and set it aside. Preheating properly ensures the tofu starts crisping immediately.
- Cut the tofu: Once pressed, cut the tofu into bite-sized cubes—about ½-inch to ¾-inch pieces. Try to keep them uniform so they cook evenly. Pat them dry with a paper towel to remove any remaining moisture.
- Make the coating mixture: In a medium bowl, combine the cornstarch, nutritional yeast (if using), garlic powder, onion powder, salt, pepper, dried herbs, and finely chopped fresh herbs. Whisk until evenly combined. The mixture should look like a dry, fragrant powder.
- Season the tofu: In a large bowl, toss the tofu cubes with the tamari or soy sauce. Let them sit for 2-3 minutes so the flavor absorbs. Then add the oil and toss again to coat.
- Coat the tofu: Sprinkle the herb-cornstarch mixture over the tofu. Toss gently until every cube is evenly coated. You want each piece to look dusty and slightly clumpy—that’s how you know you’ve got the right amount of coating.
- Arrange on baking sheet: Spread the coated tofu cubes in a single layer on the prepared baking sheet. Make sure they’re not touching—crowding the pan will steam them instead of crisping them. Leave a little space between each piece.
- Bake for 25-30 minutes: Bake for 15 minutes, then flip each piece with a spatula. Bake for another 10-15 minutes, until the tofu is golden brown and crispy on all sides. The edges should look slightly darker and crunchy.
- Cool slightly: Let the tofu rest on the baking sheet for 2-3 minutes. This helps the coating set and become even crispier. Don’t skip this step—I learned the hard way that moving them too soon makes them fall apart.
Sensory cues: At the 15-minute mark, your kitchen should smell incredibly herby and toasty. When you flip the tofu, the bottoms should be golden and slightly firm. The finished tofu should make a slight tapping sound when you drop a piece onto a plate—that’s how you know it’s perfectly crispy.
Cooking Tips & Techniques
I’ve made this recipe more times than I can count, and I’ve definitely learned a few things along the way. Here are my best tips for getting it right every single time.
Press longer than you think you need to. I know it’s tempting to rush this step, but pressing is what separates crispy tofu from sad, soggy tofu. If you’re short on time, at least press for 15 minutes. But honestly, 30 minutes is where the magic happens. The drier the tofu, the better the crunch.
Don’t skip the cornstarch. I tried making this without cornstarch once because I was out, and it was a disaster. The tofu was chewy and bland. Cornstarch creates that thin, crispy shell that makes every bite satisfying. If you’re gluten-free, arrowroot powder works just as well.
Flip carefully. When you flip the tofu at the 15-minute mark, use a thin spatula and be gentle. The coating is still setting at that point, so aggressive flipping can break the pieces apart. Slide the spatula underneath and lift, don’t scrape.
Don’t overcrowd the pan. This is probably the most common mistake I see. If the tofu pieces are touching, they’ll steam each other instead of crisping up. Spread them out with at least ½ inch between each piece. If necessary, use two baking sheets.
Let them rest. I know it’s hard to wait, but letting the tofu sit on the baking sheet for a few minutes after baking really does make a difference. The coating firms up and becomes even crunchier. I learned this the hard way after burning my fingers on too-hasty taste tests.
Double the batch. This tofu disappears fast. I always make a double batch now because the first batch never makes it to the table. Plus, leftovers are amazing on salads or in wraps the next day.
Variations & Adaptations
One of the best things about this recipe is how easy it is to change up. Here are some of my favorite variations:
Spicy Sriracha Version: Add 1 tablespoon of sriracha or chili garlic sauce to the tamari and oil mixture before tossing with the coating. The heat pairs beautifully with the herbs and gives the tofu a gorgeous reddish-golden color. I make this version when I want something with a little kick.
Lemon-Herb Version: Add 1 teaspoon of lemon zest to the coating mixture, and squeeze half a lemon over the finished tofu before serving. The bright citrus cuts through the richness and makes it taste incredibly fresh. This is my go-to for spring and summer.
Everything Bagel Version: Replace the dried herbs with 2 tablespoons of everything bagel seasoning. Skip the nutritional yeast and use sesame oil instead of olive oil. The result is savory, nutty, and completely addictive. I’ve been known to eat this straight out of the bowl for lunch.
Air Fryer Version: If you have an air fryer, this recipe works beautifully. Preheat to 375°F (190°C), arrange the coated tofu in a single layer in the basket (don’t overcrowd), and cook for 12-15 minutes, shaking the basket halfway through. The texture is even crispier than the oven version.
Gluten-Free Adaptation: Use tamari or coconut aminos instead of soy sauce, and make sure your cornstarch is certified gluten-free (most brands are). Everything else is naturally gluten-free.
Oil-Free Version: Skip the oil and use 2 tablespoons of vegetable broth or water instead. The texture won’t be quite as crispy, but it will still be delicious and much lower in fat. I’ve made this version for friends who are on whole-food plant-based diets, and they loved it.
Serving & Storage Suggestions
This crispy herbed tofu is incredibly versatile. Here’s how I like to serve and store it:
Serving ideas: Serve it warm, straight from the oven, as a snack with your favorite dipping sauce—I love it with sweet chili sauce, sriracha mayo, or a simple soy-vinegar dip. It’s also amazing on top of salads, in grain bowls with quinoa and roasted vegetables, or tucked into wraps with fresh greens and avocado. For a quick dinner, toss it with cooked noodles and a splash of sesame oil.
Storage: Store leftover tofu in an airtight container in the refrigerator for up to 4 days. The texture will soften slightly as it sits, but it’s still delicious. I actually love cold leftover tofu straight from the fridge—it makes a great high-protein snack.
Reheating: To bring back the crispiness, reheat in the oven at 350°F (175°C) for 5-7 minutes, or in an air fryer at 350°F (175°C) for 3-4 minutes. The microwave will make it soft, so I only recommend that if you’re in a hurry and don’t mind the texture change.
Freezing: I don’t recommend freezing this tofu, as the texture becomes watery and mushy when thawed. It’s best enjoyed fresh or within a few days.
Flavor development: Interestingly, the herb flavor actually deepens after a day in the fridge. I sometimes make this a day ahead when I’m meal prepping, because the second-day flavor is even better—even if the texture is slightly less crispy.
Nutritional Information & Benefits
This crispy herbed tofu isn’t just delicious—it’s packed with nutrition. Here’s a rough breakdown per serving (about ⅓ of the recipe):
- Calories: Approximately 220-250
- Protein: 18-20 grams
- Fat: 12-14 grams (mostly from healthy plant-based oils)
- Carbohydrates: 8-10 grams
- Fiber: 2-3 grams
- Iron: 15-20% of the daily value
- Calcium: 10-15% of the daily value
Health benefits: Tofu is a complete plant protein, meaning it contains all nine essential amino acids. It’s also a great source of iron, calcium, and magnesium. The herbs add antioxidants and anti-inflammatory compounds, while the olive oil provides heart-healthy monounsaturated fats. This recipe is naturally dairy-free, egg-free, and can easily be made gluten-free. It’s also relatively low in carbs, making it suitable for low-carb and keto diets if you watch your portion sizes.
Dietary considerations: This recipe is vegan, vegetarian, and dairy-free. For a soy-free option, substitute the tofu with pressed and cubed firm tempeh (though the texture will be different). Always check your tamari or soy sauce for gluten if that’s a concern.
I love that this snack makes me feel good—not just because it tastes amazing, but because I know I’m eating something that actually nourishes my body. It’s the kind of food that satisfies both the craving for something crunchy and the desire to eat well.
Conclusion
This crispy herbed tofu has become one of those recipes I genuinely look forward to making. It’s simple enough for a busy weeknight, but impressive enough to serve to guests who think they don’t like tofu. The combination of herbs, the perfect crunch, and that savory umami flavor—it just works.
I encourage you to make this recipe your own. Play with the herb combinations, try different dipping sauces, or toss it into your favorite bowl or wrap. That’s the beauty of this recipe—it’s a canvas for your creativity. And honestly, it’s hard to go wrong when you start with perfectly crispy, herby tofu.
If you make this, I’d love to hear about it. Drop a comment below and tell me how it turned out, what variations you tried, or even how you served it. And if you’re looking for more easy, protein-packed recipes, you might enjoy this cozy creamy vegan butter bean soup for another satisfying plant-based meal, or these easy fluffy sausage pancake bites for a fun breakfast twist.
Happy cooking, friend. I hope this recipe brings you as much joy as it’s brought me.
Frequently Asked Questions
Can I use soft or silken tofu for this recipe?
No, I really don’t recommend it. Soft and silken tofu have too much water content, which means they won’t crisp up properly and will likely fall apart during baking. Stick with extra-firm or firm tofu for the best results.
How do I make sure my tofu gets extra crispy?
Press it thoroughly (30 minutes is ideal), pat it dry after cutting, and don’t skip the cornstarch. Also, make sure your oven is fully preheated and the tofu pieces aren’t touching on the baking sheet. These small steps make a huge difference.
Can I make this recipe ahead of time for meal prep?
Absolutely. You can press and cube the tofu a day ahead and store it in the fridge. You can also bake the full batch and reheat it during the week. Just keep in mind that the texture will be slightly softer after refrigeration, but it’s still delicious.
What dipping sauces go well with crispy herbed tofu?
Sweet chili sauce is my personal favorite, but sriracha mayo, peanut sauce, soy-vinegar dip, or even a simple ranch dressing all work beautifully. The herbs in the tofu complement a wide range of flavors.
Can I freeze the baked tofu?
I don’t recommend it. Freezing and thawing changes the texture of tofu, making it watery and spongy. This recipe is best enjoyed fresh or within a few days of making it. If you need to meal prep for longer, just press and cube the raw tofu, then freeze it—you can thaw and bake it later.
Pin This Recipe!

Crispy Herbed Tofu: Best High-Protein Snack
This crispy herbed tofu is a quick and easy high-protein snack that’s packed with flavor and crunch. Perfect for snacking, salads, bowls, or stir-fries, it’s a crowd-pleaser that even tofu skeptics love.
- Prep Time: 30 minutes
- Cook Time: 25 minutes
- Total Time: 55 minutes
- Yield: 4 servings 1x
- Category: Snack
- Cuisine: American
Ingredients
- 1 (14-16 oz) block extra-firm tofu
- 2 tablespoons fresh herbs (parsley and chives, finely chopped)
- 1 teaspoon dried oregano
- 1 teaspoon dried basil
- 2 tablespoons cornstarch
- 1 tablespoon nutritional yeast (optional)
- 1 teaspoon garlic powder
- ½ teaspoon onion powder
- ½ teaspoon fine sea salt
- ¼ teaspoon freshly ground black pepper
- 2 tablespoons olive oil or avocado oil
- 1 tablespoon tamari or soy sauce
Instructions
- Press the tofu: Remove tofu from package and drain. Wrap in a clean kitchen towel or paper towels, place on a plate, top with another plate or cutting board, and weigh down with something heavy (e.g., cast iron skillet, cans, books). Press for at least 20-30 minutes.
- Preheat oven to 400°F (200°C). Line a baking sheet with parchment paper.
- Cut pressed tofu into bite-sized cubes (about ½ to ¾ inch). Pat dry with a paper towel.
- In a medium bowl, combine cornstarch, nutritional yeast (if using), garlic powder, onion powder, salt, pepper, dried oregano, dried basil, and fresh herbs. Whisk until evenly mixed.
- In a large bowl, toss tofu cubes with tamari or soy sauce. Let sit for 2-3 minutes. Add oil and toss again to coat.
- Sprinkle the herb-cornstarch mixture over the tofu and toss gently until each cube is evenly coated.
- Arrange coated tofu in a single layer on the prepared baking sheet, ensuring pieces are not touching.
- Bake for 15 minutes. Flip each piece with a spatula, then bake for another 10-15 minutes until golden brown and crispy on all sides.
- Let tofu rest on the baking sheet for 2-3 minutes before serving.
Notes
Press tofu longer for extra crispiness. Don’t skip cornstarch—it creates the crispy shell. Avoid overcrowding the pan to prevent steaming. Let tofu rest after baking for crunchier texture. Double the batch as it disappears quickly.
Nutrition
- Serving Size: ⅓ of recipe
- Calories: 235
- Sugar: 1
- Sodium: 480
- Fat: 13
- Saturated Fat: 2
- Carbohydrates: 9
- Fiber: 2.5
- Protein: 19
Keywords: crispy tofu, herbed tofu, high-protein snack, vegan snack, easy tofu recipe


