Love this? Save it for later!
Share the inspiration with your friends
“Are you sure you want to put pizza in a pot pie?” That’s what my friend Lisa asked me over the phone last Friday night as I rattled off my dinner plans. Honestly, I was half-expecting her skepticism. After all, combining two comfort food classics—pizza and pot pie—sounds like one of those wild kitchen experiments that could go either way. But one bite of my mouthwatering pizza pot pies quickly changed the tone of the conversation.
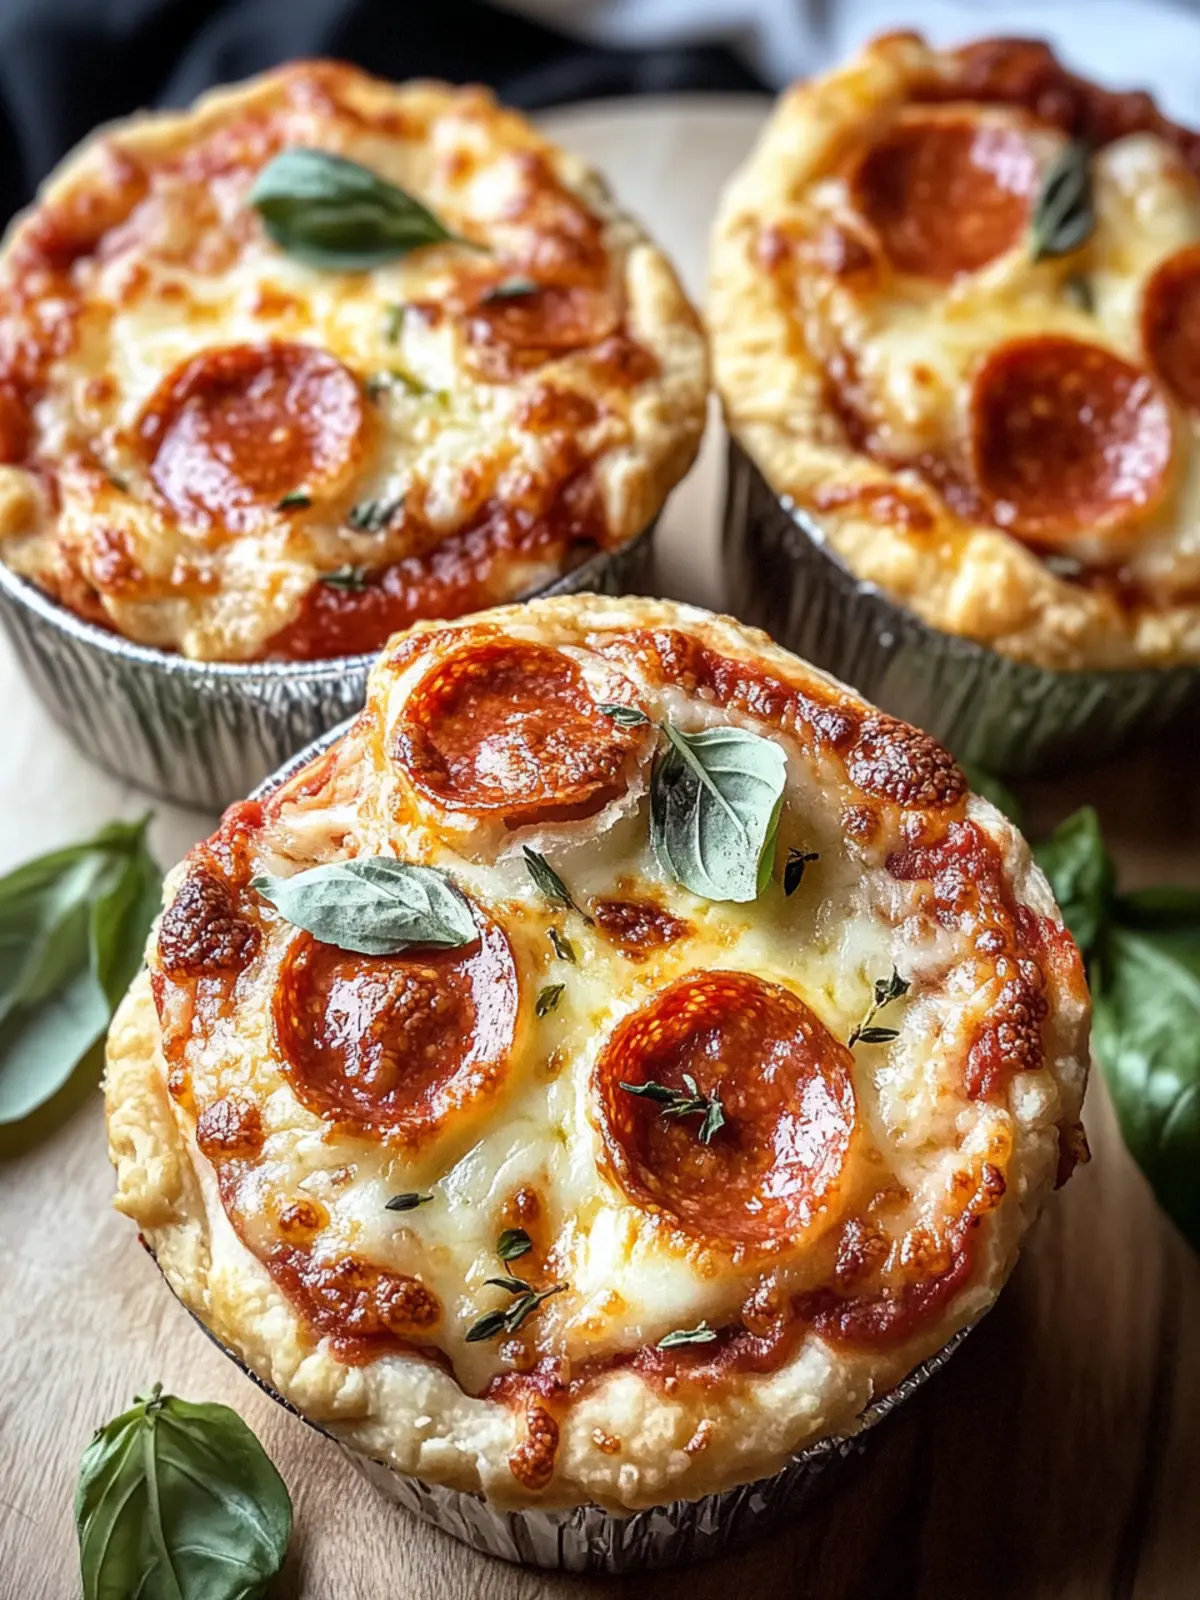
It wasn’t some grand plan or fancy recipe testing marathon that birthed these pot pies. Nope. It was a chaotic evening where the fridge was low on supplies, the kids were hangry, and I needed something fast, customizable, and satisfying. I grabbed some store-bought biscuit dough, canned pizza sauce, shredded cheese, and whatever toppings were left hanging around. The result? A bubbling, golden crust hiding gooey, flavorful pizza filling that everyone dove into—no complaints, just a lot of happy sighs.
I must admit, this recipe has quietly taken over my weeknight dinners since then. It’s that rare dish that combines ease, fun, and flexibility without making you feel like you’re sacrificing flavor or time. Plus, it’s a great way to sneak in veggies or use up leftovers, which is a win for busy nights. If you’re curious about a cozy, customizable dinner that brings pizza night to a whole new level, these pizza pot pies might just become your new go-to.
There’s something quietly satisfying about breaking through that flaky crust to reveal a warm, melty pizza filling. It’s the kind of meal that feels like a hug after a long day, and I have a feeling it’ll stick with you for similar reasons.
Why You’ll Love This Recipe
Having made these pizza pot pies more times than I can count, I’ve picked up a few things that make this recipe stand apart from your usual pizza or pot pie routine. Here’s why it’s worth your time:
- Quick & Easy: From start to finish, this recipe takes less than 40 minutes. Perfect for those nights when you want a homemade meal without the fuss.
- Simple Ingredients: No need to hunt for specialty items. Most ingredients are pantry staples or easy to find in any grocery store.
- Perfect for Customization: Whether you’re feeding picky eaters or adventurous foodies, you can tweak the toppings and fillings however you like.
- Crowd-Pleaser: I’ve brought these pot pies to casual get-togethers and family dinners, and they always disappear fast.
- Unbelievably Delicious: The buttery crust paired with the savory, melty pizza center is comfort food at its finest.
This isn’t your standard frozen pot pie or takeout pizza. The magic here lies in balancing the flaky crust with a rich pizza filling that’s seasoned just right. I like to blend a little Italian seasoning right into the tomato sauce, and sometimes I fold in ricotta cheese for extra creaminess—that trick makes the texture just right. Plus, you can swap out the biscuit dough for puff pastry or even homemade pie crust if you’re feeling fancy.
In short, this recipe turns a simple idea into an experience—you know, the kind that makes you savor every bite and maybe even close your eyes for a second or two. It’s a cozy, satisfying meal you’ll want to make again and again, especially on those nights when you crave something familiar yet a little different.
What Ingredients You Will Need
This recipe uses simple, wholesome ingredients to deliver bold flavor and satisfying texture without the fuss. Most are pantry staples or easy to grab on your next grocery run. Here’s what you’ll want on hand:
- For the crust:
- 1 can (16.3 oz/462 g) refrigerated biscuit dough (or 1 sheet puff pastry, thawed)
- For the filling:
- 1 cup (240 ml) pizza sauce (store-bought or homemade)
- 1 ½ cups (170 g) shredded mozzarella cheese (I recommend Sargento or Kraft for melting)
- ½ cup (120 g) ricotta cheese (optional, adds creaminess)
- ½ teaspoon dried Italian seasoning (blend of basil, oregano, thyme)
- ½ cup (75 g) diced pepperoni or cooked sausage (optional, for protein)
- ½ cup (75 g) bell peppers, diced (red or green, adds freshness)
- ¼ cup (30 g) sliced black olives (optional, for tang)
- ¼ cup (40 g) diced mushrooms (optional, earthy flavor)
- For assembly:
- 1 egg, beaten (for egg wash, gives crust a golden shine)
Ingredient tips: Look for firm biscuit dough that’s not too crumbly for best crust results. If you want a gluten-free option, almond flour-based pastry or gluten-free biscuit dough works well. For a vegan twist, swap mozzarella for vegan cheese and use a plant-based biscuit dough.
In summer, I sometimes swap in fresh cherry tomatoes and basil instead of bell peppers for a bright twist. And if you want to keep it simple, just cheese and sauce make a perfectly fine filling.
Equipment Needed
Here’s what you’ll need to whip up these pizza pot pies without a hitch:
- Oven-safe ramekins or small cast-iron skillets (6 to 8 ounces/180 to 240 ml capacity) – these hold the individual pies perfectly.
- Baking sheet – to place ramekins on for easy handling and catching drips.
- Mixing bowls – for combining ingredients and mixing the filling.
- Measuring cups and spoons – for accurate ingredient amounts.
- Pastry brush – to apply the egg wash on the crust for that perfect golden finish.
- Sharp knife or kitchen scissors – for cutting biscuit dough and toppings.
If you don’t have ramekins, small oven-safe mugs or even mini loaf pans can work as a substitute. I’ve even used muffin tins with success, just adjust the dough quantity accordingly. A budget-friendly tip: thrift stores often have affordable ramekins or small baking dishes that work great for this recipe.
Taking good care of your cast iron skillets by seasoning them regularly will keep them non-stick and ready for recipes like this. And if you’re using puff pastry, a rolling pin can help shape the dough neatly over the filling.
Preparation Method
- Preheat your oven to 375°F (190°C). This gives the crust and filling enough heat to cook through evenly.
- Prepare the filling: In a medium bowl, combine 1 cup (240 ml) pizza sauce, 1 ½ cups (170 g) shredded mozzarella, ½ cup (120 g) ricotta (if using), ½ teaspoon Italian seasoning, and your choice of diced pepperoni, bell peppers, olives, and mushrooms. Mix gently to combine. The filling should be thick but spreadable. If it feels too runny, add a bit more cheese or a teaspoon of breadcrumbs to thicken.
- Prepare the crust: Separate the biscuit dough into individual biscuits. Flatten each biscuit into a circle about 4-5 inches (10-12 cm) in diameter. If using puff pastry, cut into squares slightly larger than your ramekins.
- Assemble the pot pies: Lightly grease your ramekins or skillets. Press one flattened biscuit or pastry square into each dish, pushing it gently up the sides to form a shell.
- Fill each crust: Spoon the pizza filling evenly into each crust-lined dish, leaving about ¼ inch (0.5 cm) space at the top.
- Top with crust: Flatten another biscuit or pastry piece and place it over the filling. Press edges together to seal, trimming any excess dough if needed. Use a fork to crimp the edges for a rustic look and to prevent leaks.
- Brush with egg wash: Lightly brush the tops of each pot pie with beaten egg. This step gives you that irresistible golden, shiny crust.
- Make vents: Cut 2-3 small slits in the top crust to allow steam to escape during baking.
- Bake: Place ramekins on a baking sheet and bake for 25-30 minutes, or until the crust is golden brown and the filling is bubbling. You’ll want the cheese melted and the sauce hot underneath.
- Cool & serve: Let the pot pies cool for 5 minutes before serving. This rest time helps the filling set slightly and prevents burning your mouth!
Pro tip: If the crust browns too quickly, tent with foil halfway through baking to avoid burning. Also, if you notice filling leaking, make sure the edges are sealed well next time or consider chilling the assembled pies for 10 minutes before baking to firm up the dough.
Cooking Tips & Techniques
Honestly, the secret to these pizza pot pies is in the balance between crust crispiness and filling creaminess. Here are some tips that I’ve learned through trial and error:
- Don’t overload the filling: It’s tempting to stuff as much as possible inside, but too much filling will cause leaks or soggy crust. Keep it moderate—about ½ cup (120 ml) per pot pie works well.
- Seal the edges properly: Press firmly and crimp with a fork. If you skip this, you’ll get bubbling sauce escaping all over the oven (been there, done that!).
- Use an egg wash: This step transforms the crust from plain biscuit dough to that golden, bakery-style finish. If you’re dairy-free, a little olive oil brushed on top works too.
- Multitask while baking: These pot pies bake in about 30 minutes, so you can easily throw together a quick side salad or warm up some fresh fruit kabobs to balance the meal.
- Leftover magic: I often make double batches and refrigerate the uncooked pies for up to 24 hours, then bake fresh later. Just add an extra 5 minutes to baking time.
One time, I forgot to cut vents in the crust, and the pies puffed up like little balloons. It was hilarious but messy! So definitely don’t skip that step. Also, if you want a crispier bottom crust, try preheating a baking sheet in the oven and placing the ramekins on it—this gives more direct heat to the base.
Variations & Adaptations
One thing I love about these pizza pot pies is how flexible they are. Here are some ideas to make the recipe your own:
- Vegetarian version: Load up on bell peppers, mushrooms, olives, spinach, or artichokes. Skip the meat and maybe add some chickpeas for extra protein.
- Spicy twist: Add chopped jalapeños or a dash of crushed red pepper flakes into the filling for a kick. You can even swap regular pepperoni for spicy chorizo.
- Gluten-free crust: Use almond flour biscuit dough or a gluten-free pie crust. Just watch the baking time as gluten-free doughs can brown faster.
- Mini pot pies: Use a muffin tin to create bite-sized versions for parties or snacks.
- Cheese variations: Experiment with provolone, cheddar, or a blend of Italian cheeses. Goat cheese crumbles add a tangy richness.
Personally, I once swapped the pizza sauce for a creamy Alfredo base and added grilled chicken and broccoli for a white pizza pot pie variation. It was a hit and made me rethink what “pizza” could mean. So don’t be afraid to get creative here!
Serving & Storage Suggestions
These pizza pot pies are best served warm, straight from the oven, when the crust is still flaky and the cheese melty. I like to garnish with a sprinkle of fresh basil or parsley for color and a little freshness.
They pair wonderfully with a crisp green salad or something light like the fresh fruit kabobs to balance the richness. For drinks, a chilled soda or sparkling water works nicely.
To store leftovers, cover the pot pies tightly with plastic wrap or transfer to an airtight container and refrigerate for up to 3 days. When reheating, I recommend warming them in a 350°F (175°C) oven for 10-15 minutes to keep the crust crisp. Microwave reheating tends to make the crust soggy.
Flavors tend to deepen after resting overnight, so if you make them ahead, the next-day taste is often even better—just reheat gently to bring back that fresh-baked feel.
Nutritional Information & Benefits
Each pizza pot pie (based on 6 servings) approximately contains:
| Calories | 320 kcal |
|---|---|
| Protein | 15 g |
| Carbohydrates | 28 g |
| Fat | 15 g |
| Fiber | 2 g |
Using simple ingredients like tomato sauce and veggies adds vitamins A and C, plus lycopene from the tomatoes, known for its antioxidant properties. The cheese provides calcium and protein, supporting muscle and bone health.
If you’re looking for a gluten-free or lower-carb option, swapping the crust for almond flour dough cuts carbs and adds healthy fats. The flexibility of this recipe lets you adjust it to fit your dietary needs without sacrificing flavor. Just keep an eye on the cheese and meat amounts if monitoring fat intake.
Conclusion
These mouthwatering pizza pot pies offer a cozy, customizable dinner that’s as fun to make as it is to eat. They’ve become a staple in my kitchen for good reason—they balance quick prep, comforting flavors, and the chance to personalize every bite. Whether you’re feeding a family or cooking for one, this recipe adapts to your mood and pantry.
What I love most is how it turns an ordinary pizza night into something a little more special without extra fuss. Plus, it’s a great way to sneak in veggies or leftovers, so no food goes to waste. I hope you find the same joy in making these pot pies that I do—there’s something quietly satisfying about that golden crust and melty filling combo.
If you try the recipe, I’d love to hear how you customize it or any fun twists you add. And hey, if you’re in the mood for more cozy, crowd-pleasing dishes, you might enjoy my easy cheesy crockpot ravioli lasagna or the savory stromboli stuffed bread—both perfect for busy evenings too.
Here’s to many delicious, comforting nights ahead with these pizza pot pies!
FAQs About Pizza Pot Pies
Can I make pizza pot pies ahead of time?
Yes! Assemble the pot pies and refrigerate them covered for up to 24 hours before baking. Just add a few extra minutes to the baking time when ready to cook.
What can I use if I don’t have biscuit dough?
Puff pastry, pie crust, or even homemade pizza dough can work well as alternatives. Just adjust baking times slightly and watch for browning.
Are these pot pies freezer-friendly?
Definitely. Freeze unbaked pies wrapped tightly in plastic and foil for up to 2 months. Bake from frozen, adding 10-15 minutes to the cooking time.
How do I prevent the crust from getting soggy?
Don’t overfill, seal edges well, and consider preheating the baking sheet for a crisp bottom crust. Also, letting the pies rest a few minutes after baking helps the filling set.
Can I make these vegan?
Yes! Use vegan biscuit dough or puff pastry, dairy-free cheese alternatives, and swap meat toppings for veggies or plant-based proteins.
Pin This Recipe!

Pizza Pot Pies

Cozy, customizable pizza pot pies with a flaky crust and melty pizza filling, perfect for quick weeknight dinners or casual get-togethers.
- Prep Time: 10 minutes
- Cook Time: 30 minutes
- Total Time: 40 minutes
- Yield: 6 servings 1x
- Category: Main Course
- Cuisine: American
Ingredients
- 1 can (16.3 oz / 462 g) refrigerated biscuit dough or 1 sheet puff pastry, thawed
- 1 cup (8 fl oz / 240 ml) pizza sauce (store-bought or homemade)
- 1 ½ cups (6 oz / 170 g) shredded mozzarella cheese
- ½ cup (4 oz / 120 g) ricotta cheese (optional)
- ½ teaspoon dried Italian seasoning (blend of basil, oregano, thyme)
- ½ cup (2.6 oz / 75 g) diced pepperoni or cooked sausage (optional)
- ½ cup (2.6 oz / 75 g) diced bell peppers (red or green)
- ¼ cup (1 oz / 30 g) sliced black olives (optional)
- ¼ cup (1.4 oz / 40 g) diced mushrooms (optional)
- 1 egg, beaten (for egg wash)
Instructions
- Preheat your oven to 375°F (190°C).
- In a medium bowl, combine pizza sauce, shredded mozzarella, ricotta (if using), Italian seasoning, and your choice of diced pepperoni, bell peppers, olives, and mushrooms. Mix gently to combine. If too runny, add more cheese or a teaspoon of breadcrumbs to thicken.
- Separate biscuit dough into individual biscuits and flatten each into a 4-5 inch (10-12 cm) circle. If using puff pastry, cut into squares slightly larger than your ramekins.
- Lightly grease oven-safe ramekins or skillets. Press one flattened biscuit or pastry square into each dish, pushing it gently up the sides to form a shell.
- Spoon the pizza filling evenly into each crust-lined dish, leaving about ¼ inch (0.5 cm) space at the top.
- Top with another flattened biscuit or pastry piece. Press edges together to seal and trim excess dough. Crimp edges with a fork.
- Brush the tops with beaten egg for a golden, shiny crust.
- Cut 2-3 small slits in the top crust to allow steam to escape.
- Place ramekins on a baking sheet and bake for 25-30 minutes until crust is golden brown and filling is bubbling.
- Let the pot pies cool for 5 minutes before serving.
Notes
Do not overfill the pies to prevent leaks or soggy crust. Seal edges firmly and crimp with a fork. Use egg wash for a golden crust or olive oil for dairy-free option. If crust browns too quickly, tent with foil halfway through baking. Preheat baking sheet for crispier bottom crust. Assemble ahead and refrigerate up to 24 hours before baking, adding extra baking time. Freeze unbaked pies for up to 2 months.
Nutrition
- Serving Size: 1 pot pie
- Calories: 320
- Fat: 15
- Carbohydrates: 28
- Fiber: 2
- Protein: 15
Keywords: pizza pot pies, easy dinner, customizable pizza, biscuit dough pot pie, quick weeknight meal, comfort food, pizza recipe


