Love this? Save it for later!
Share the inspiration with your friends
I was standing at the stove at 6:47 AM, staring at a pot of water that had just barely started to simmer. My coffee was getting cold on the counter, and I had about twelve minutes before I needed to wake my daughter up for school. That’s when I remembered the video I’d saved on my phone weeks ago—a Japanese chef showing how to make onsen tamago, those silky hot spring eggs with the custard-like whites and jammy yolks. I’d bookmarked it thinking “someday,” but someday had arrived on a random Tuesday morning when I needed something fast, warm, and just a little bit special.
The first one came out perfect. I cracked it over a bowl of rice, added a splash of soy sauce, and stood at the counter eating breakfast like I’d just discovered a secret. The white was so soft it barely held its shape, and the yolk ran like melted butter. Honestly, I couldn’t believe I’d been making hard-boiled eggs my whole life when this existed. I made three more that week—one for lunch on a salad, one on top of ramen, and one just eaten straight from the shell with a pinch of salt.
What gets me about these silky Japanese hot spring eggs is how something so simple can feel so luxurious. You don’t need a hot spring or any fancy equipment. Just water, a timer, and a little patience. The texture is completely different from poached or soft-boiled eggs—it’s like the egg equivalent of silken tofu, delicate and almost creamy. And the best part? It takes ten minutes from start to finish. Ten minutes. That’s less time than it takes to decide what to order for takeout.
Why You’ll Love This Recipe
I’ve tested this method at least two dozen times now, tweaking temperatures and timing until I got it just right. Here’s why I keep coming back to it and why I think you will too.
- Quick & Easy: From pot to plate in exactly 10 minutes. No complicated techniques, no special tools, no stress. Just set a timer and walk away.
- Simple Ingredients: You need eggs and water. That’s it. No vinegar, no swirling, no poaching tricks. If you have eggs in your fridge, you’re already halfway there.
- Perfect for Busy Mornings: Crack one over rice, toast, or a grain bowl for instant protein that feels like a restaurant breakfast. I’ve eaten these on rushed mornings more times than I can count.
- Crowd-Pleaser: Every single person I’ve made these for has asked how to do it. Kids love the fun texture, adults love the elegance, and everyone loves how easy it is.
- Unbelievably Delicious: The white is so tender it practically melts, and the yolk is rich and buttery without being overcooked. It’s comfort food that somehow feels fancy.
What makes this recipe different from the thousands of egg recipes out there is the precise temperature control. Most soft-boiled egg methods leave you with either runny whites or chalky yolks. This technique hits that sweet spot where the white is just set—barely holding together—and the yolk is warm, thick, and luscious. It’s the texture you get at fancy Japanese restaurants, but you’re making it in your own kitchen with zero stress.
This is the kind of recipe that makes you feel like you’ve unlocked a secret level of cooking. It’s not about impressing anyone else—it’s about sitting down to a bowl of something that feels like a hug, even on the most ordinary Tuesday morning.
What Ingredients You Will Need
This recipe uses the most minimal ingredients imaginable, which is exactly why it works so well. When you’re not hiding behind spices or sauces, the quality and handling of each ingredient really matters.
- Fresh large eggs (4–6, at room temperature): Freshness matters more here than with any other egg preparation. Fresh eggs hold their shape better and the whites set more evenly. I always use large eggs from the refrigerated section, but I let them sit on the counter for about 15 minutes before cooking. Older eggs tend to have thinner whites that can get a bit messy. If you can, grab eggs from a local farm or a brand you trust—the difference in yolk color and flavor is noticeable.
- Water (enough to cover eggs by at least 1 inch): Tap water is totally fine, but if your water has a strong mineral taste, filtered is better. The eggs absorb a tiny bit of water during cooking, so cleaner water means cleaner flavor.
- Ice bath (water and ice cubes): This stops the cooking instantly and makes peeling or handling much easier. I keep a bowl of ice water ready before I even turn on the stove.
- Optional: Soy sauce, sesame oil, furikake, or flaky salt for serving. These aren’t part of the cooking process, but they’re how you’ll finish the dish. I’m partial to a splash of dark soy sauce and a sprinkle of furikake over rice.
That’s genuinely it. No vinegar, no salt in the water, no complicated gadgets. The magic is entirely in the temperature and timing. I’ve made these with everything from fancy pasture-raised eggs to basic store-brand eggs, and they work beautifully with all of them. The pasture-raised ones do have richer yolks, but honestly, even the budget eggs come out silky and delicious.
One thing I’ll note: if you’re using extra-large or jumbo eggs, you might need to add about 30 seconds to the cooking time. And if your eggs are straight from the fridge, add about a minute to the simmer time. But for standard large eggs at room temperature, this timing is bulletproof.
Equipment Needed
You don’t need much for this, which is part of the beauty. Here’s what I use every time.
- A medium saucepan: Big enough to hold your eggs in a single layer with room to spare. I use a 2-quart saucepan. Too small and the eggs crowd each other; too large and it takes forever to bring the water to temperature.
- A thermometer: This is the one piece of equipment I really recommend. An instant-read digital thermometer makes this recipe foolproof. You’re aiming for 167°F (75°C), and guessing by eye is tricky. I’ve done it without a thermometer, and it works about 70% of the time. With a thermometer, it works every single time.
- A slotted spoon: For gently lowering the eggs into the water and fishing them out. A spider skimmer works great too.
- A bowl for the ice bath: Any mixing bowl will do. Fill it with cold water and a handful of ice cubes before you start.
- Optional: Egg cups or small ramekins for serving. Not necessary, but they make the presentation lovely.
If you don’t have a thermometer, you can still make this work. Bring the water to a bare simmer—tiny bubbles on the bottom of the pot, but no rolling boil—and keep it there. The margin for error is narrower, but it’s doable. I’ve definitely made these in a pinch without a thermometer and they came out great. Just keep a close eye on the water temperature.
Preparation Method
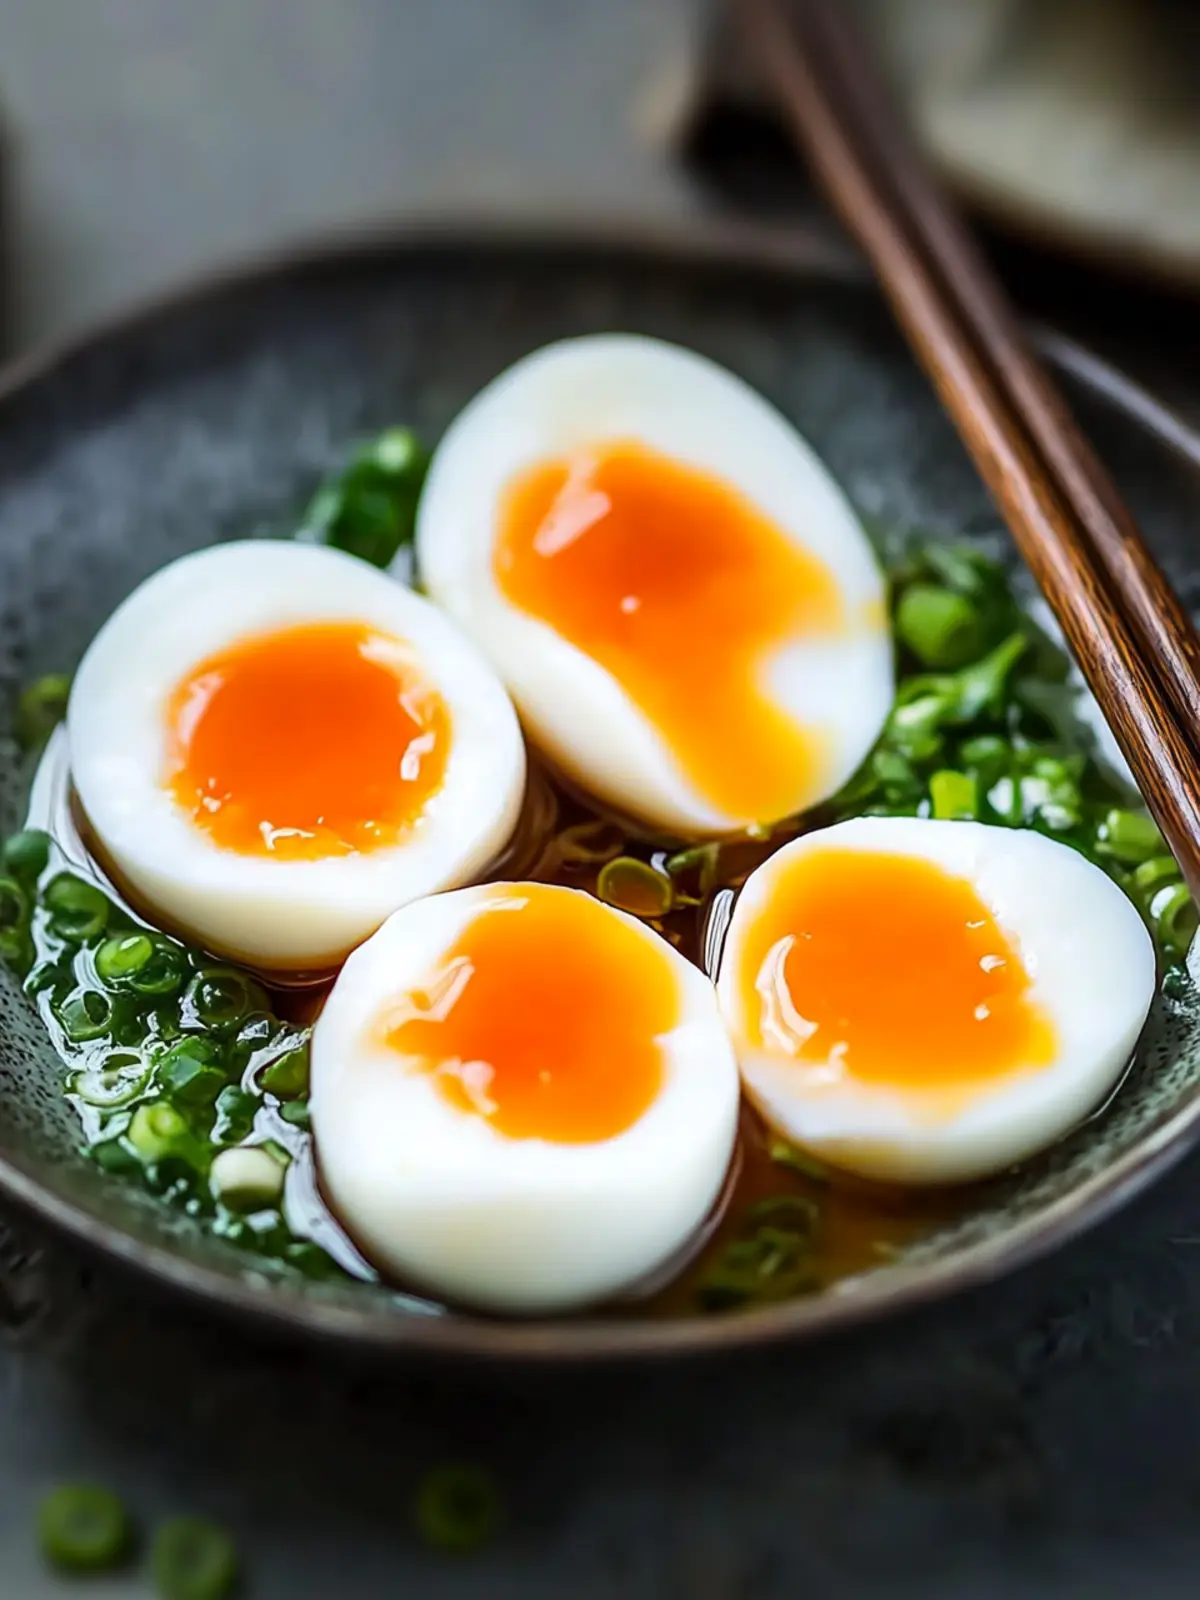
This is where the magic happens. Follow these steps exactly, and you’ll have perfect silky Japanese hot spring eggs every time.
- Bring your eggs to room temperature. Take the eggs out of the fridge about 15 minutes before you start cooking. This helps them cook evenly. If you’re in a rush, place them in a bowl of warm tap water for 5 minutes. I’ve done this many times and it works fine.
- Fill your saucepan with water. Use enough water to cover the eggs by at least an inch. Place the saucepan on the stove over medium-high heat.
- Heat the water to exactly 167°F (75°C). This is the critical moment. Use your thermometer and watch carefully. Once it hits 167°F, reduce the heat to low to maintain that temperature. You want it steady, not climbing. If it starts to climb, add a splash of cold water. If it drops, nudge the heat up slightly.
- Gently lower the eggs into the water. Use your slotted spoon to carefully place each egg into the hot water. Don’t drop them in—they can crack. Lower them gently and let them settle on the bottom of the pan.
- Set a timer for 10 minutes. This is hands-off time. Don’t stir, don’t peek too often, just let them sit in the 167°F water. The water temperature might drop a degree or two when you add the eggs, which is fine. Just keep the heat low and steady.
- Prepare the ice bath while the eggs cook. Fill a bowl with cold water and a generous handful of ice cubes. Set it next to the stove so you can transfer the eggs quickly.
- Remove the eggs after exactly 10 minutes. Use your slotted spoon to lift each egg out of the hot water and immediately transfer it to the ice bath. Let them sit in the cold water for about 2–3 minutes. This stops the cooking process and makes them easier to handle.
- Crack and serve. Gently tap the egg around the middle and peel carefully—the white is very delicate. Or, if you’re serving it in a bowl, just crack it directly over your rice or salad. The white will be soft and barely set, and the yolk should be warm and runny.
The first time I made these, I was nervous about the peeling. Let me save you the trouble: the best way to serve these is to crack them directly into a bowl or over your dish. Trying to peel them like a hard-boiled egg will usually end in frustration because the white is so tender. Instead, tap the shell gently all around, then open it over your bowl and let the egg slide out. It’s much easier and more elegant.
If you’re serving them in the shell (like in an egg cup), use a small knife to carefully cut off the top quarter of the shell. Then scoop out the silky egg with a small spoon. This is how they’re often served in Japan, and it feels incredibly special.
Cooking Tips & Techniques
After making these dozens of times, I’ve collected a few tricks that make the process smoother and the results more consistent.
Temperature is everything. I cannot overstate this. 167°F (75°C) is the sweet spot. If your water is too hot, the whites will turn rubbery and the yolks will set too firmly. Too cool, and the whites won’t set at all—you’ll end up with basically raw eggs. I keep my thermometer clipped to the side of the pot the whole time. If you don’t have a thermometer, aim for water that’s steaming steadily with tiny bubbles forming on the bottom of the pan but no surface movement. It takes practice, but you’ll get a feel for it.
Don’t crowd the pot. I cook no more than four eggs at a time in a standard saucepan. If you try to cook six or eight, the water temperature drops too much when you add them, and they won’t cook evenly. Cook in batches if you need more. Trust me, it’s worth the extra few minutes.
Room temperature eggs matter. I learned this the hard way. The first time I tried this with cold eggs straight from the fridge, the whites came out uneven—some parts were set, others were still raw. Letting the eggs sit out for 15 minutes makes a huge difference. It’s a small step that pays off big.
Use a timer, not your memory. I’ve definitely gotten distracted and let eggs sit for 12 or 13 minutes. At that point, you’re getting closer to a soft-boiled egg than a hot spring egg. Set a timer for 10 minutes and stick to it. The texture at exactly 10 minutes is perfect.
One mistake I made early on was trying to reuse the same water for multiple batches. The water temperature fluctuates too much, and the eggs from the second batch never came out as good. Fresh water for each batch is the way to go.
Variations & Adaptations
Once you’ve mastered the basic technique, there are so many ways to play with it. Here are a few of my favorites.
Soy-Marinated Hot Spring Eggs: After cooking and cooling the eggs, peel them carefully and place them in a small container. Cover with a mixture of soy sauce, mirin, and a little water (about 2:1:1 ratio). Let them marinate in the fridge for 2–4 hours. The soy sauce penetrates the delicate white just slightly, giving you those beautiful amber-colored eggs you see on ramen bowls. I made a batch of these last week and ate them over rice for three days straight.
Spicy Sesame Version: Add a teaspoon of chili oil and a splash of toasted sesame oil to your serving bowl before cracking the egg in. The heat and nuttiness pair beautifully with the silky texture. This is my go-to when I want something with a little kick.
Breakfast Bowl Style: Serve the egg over a bowl of steamed rice with avocado slices, a sprinkle of furikake, and a drizzle of soy sauce. It’s a complete meal in under 15 minutes. I’ve been making this for breakfast more often than I’d like to admit.
Low-Carb Option: Skip the rice and serve the egg over a bed of sautéed spinach or mixed greens. The warm, runny yolk acts as a dressing. Add some toasted sesame seeds and you’ve got a light, satisfying meal.
For a Crowd: If you’re serving these at brunch, cook them in batches and keep them in the ice bath until you’re ready to serve. They’ll hold for about 30 minutes in the cold water. Then just crack them over everyone’s bowls right before eating.
I’ve also tried this method with duck eggs, and they come out even richer and creamier. The timing is about the same, but the yolk is larger and more decadent. If you can find duck eggs, give it a shot.
Serving & Storage Suggestions
These eggs are best served immediately, while they’re still warm and the yolk is perfectly runny. But I’ve found a few ways to work with leftovers if you have them.
Serving Temperature: Warm is ideal. After the ice bath, the eggs will be cool but not cold. If you want them warmer, let them sit at room temperature for a few minutes before cracking. I usually transfer them from the ice bath to a plate and let them rest while I finish prepping the rest of the meal.
What to Serve With Them: These eggs are incredibly versatile. They’re amazing over steamed rice, ramen, grain bowls, salads, toast, or even just eaten straight with a pinch of salt. I love serving them alongside a simple bowl of creamy chicken pot pie soup for a cozy, satisfying meal. The silky egg adds a luxurious touch to the soup’s rich, comforting flavors.
Storage: If you have leftover cooked eggs, keep them in the shell in the refrigerator for up to 2 days. They won’t be as silky when reheated, but they’re still good. To reheat, place them in a bowl of warm water (not hot) for about 5 minutes. Don’t microwave them—the whites will turn rubbery instantly.
Make-Ahead Tip: You can cook these eggs up to a day in advance and keep them in the fridge in their shells. The texture changes slightly—the white firms up a bit—but they’re still delicious. I’ve done this for busy mornings when I wanted a quick protein boost.
I’ll be honest: the texture is best fresh. But having a couple of these in the fridge means you’re always 30 seconds away from a fancy-looking breakfast or lunch.
Nutritional Information & Benefits
These eggs are a nutritional powerhouse wrapped in a delicate package. Here’s a rough estimate per egg.
- Calories: ~70
- Protein: 6 grams
- Fat: 5 grams
- Carbohydrates: <1 gram
- Vitamin D: 10% of daily value
- Choline: 25% of daily value
Eggs are one of the most nutrient-dense foods you can eat. They’re packed with high-quality protein, healthy fats, and essential vitamins like B12, riboflavin, and selenium. The choline in eggs is particularly important for brain health and memory function.
Because this cooking method uses no added fat or oil, it’s naturally low in calories and fits easily into most dietary patterns. It’s gluten-free, keto-friendly, and paleo-approved. The only potential allergen is eggs themselves, so this isn’t suitable for anyone with an egg allergy.
I love that something this indulgent-tasting can actually be good for you. It’s real food, simply prepared, and that’s something I can always get behind.
Conclusion
These silky Japanese hot spring eggs have genuinely changed my morning routine. They’re proof that you don’t need complicated techniques or fancy ingredients to make something that feels special. Ten minutes, a pot of water, and a little patience—that’s all it takes.
What I love most about this recipe is how forgiving it is once you understand the basics. The first time you make it, you’ll be nervous. The second time, you’ll be confident. By the third time, you’ll be making them from memory while your coffee brews. And honestly, that’s the best kind of recipe to have in your back pocket.
I’d love to hear how yours turn out. Did you serve them over rice? On a salad? Straight from the shell with a pinch of flaky salt? Drop a comment below and let me know your favorite way to enjoy these. And if you make any fun variations, share those too—I’m always looking for new ideas.
Here’s to simple food that makes us happy.
Frequently Asked Questions
Can I make these without a thermometer?
Yes, but it takes practice. Bring the water to a bare simmer—tiny bubbles on the bottom of the pot, no surface movement—and maintain that temperature for the full 10 minutes. The margin for error is smaller, but it’s doable. I did it for weeks before I got a thermometer.
Why did my eggs come out runny?
The water was probably not hot enough. Make sure you’re maintaining a steady 167°F (75°C). If the water drops below 160°F, the whites won’t set properly. Also, make sure your eggs are at room temperature before cooking.
Can I double this recipe?
You can, but cook in batches. Don’t crowd the pot—cook no more than 4 eggs at a time. If you try to cook more, the water temperature drops too much and the eggs cook unevenly. Fresh water for each batch gives the best results.
How do I peel these without destroying them?
Don’t try to peel them like hard-boiled eggs. Instead, tap the shell gently all around, then crack it open over your bowl and let the egg slide out. The white is very delicate, so handle it gently. For serving in the shell, cut off the top with a small knife and eat with a spoon.
Can I meal prep these for the week?
You can cook them up to 2 days in advance and keep them in the shell in the fridge. The texture changes slightly—the white firms up a bit—but they’re still delicious. Reheat by placing them in warm water for 5 minutes. Don’t microwave them.
Pin This Recipe!

Silky Japanese Hot Spring Eggs: Easy 10-Minute Recipe
Learn how to make silky Japanese hot spring eggs (onsen tamago) with custard-like whites and jammy yolks in just 10 minutes. This simple, foolproof method requires only eggs and water for a luxurious breakfast or topping.
- Prep Time: 5 minutes
- Cook Time: 10 minutes
- Total Time: 15 minutes
- Yield: 4 servings 1x
- Category: Breakfast
- Cuisine: Japanese
Ingredients
- 4–6 fresh large eggs, at room temperature
- Water (enough to cover eggs by at least 1 inch)
- Ice bath (water and ice cubes)
- Optional: Soy sauce, sesame oil, furikake, or flaky salt for serving
Instructions
- Bring your eggs to room temperature by taking them out of the fridge about 15 minutes before cooking. If in a rush, place them in a bowl of warm tap water for 5 minutes.
- Fill a medium saucepan with enough water to cover the eggs by at least an inch. Place over medium-high heat.
- Heat the water to exactly 167°F (75°C). Use a thermometer to monitor. Once it reaches 167°F, reduce heat to low to maintain that temperature.
- Gently lower the eggs into the water using a slotted spoon. Do not drop them in to avoid cracking.
- Set a timer for 10 minutes. Do not stir; let the eggs sit in the 167°F water with the heat on low.
- While the eggs cook, prepare an ice bath by filling a bowl with cold water and a generous handful of ice cubes.
- After exactly 10 minutes, use the slotted spoon to transfer the eggs to the ice bath. Let them sit for 2-3 minutes to stop the cooking process.
- To serve, gently tap the egg around the middle and crack it directly over a bowl of rice, salad, or ramen. The white will be soft and the yolk runny. Alternatively, cut off the top of the shell and eat with a spoon.
Notes
Temperature is critical: maintain a steady 167°F (75°C). Do not crowd the pot; cook no more than 4 eggs at a time. For best results, use room temperature eggs. If peeling, crack directly over the dish rather than peeling like a hard-boiled egg. Leftover eggs can be stored in the shell in the refrigerator for up to 2 days; reheat in warm water (not microwave).
Nutrition
- Serving Size: 1 egg
- Calories: 70
- Sodium: 70
- Fat: 5
- Saturated Fat: 1.6
- Carbohydrates: 1
- Protein: 6
Keywords: Japanese hot spring eggs, onsen tamago, silky eggs, 10-minute recipe, easy breakfast, soft eggs, jammy yolk


